 elixxier – Photo Blog Light settings and lighting structures for studio and outdoor photography. Tips and tricks for set.a.light 3D – The photo studio and light simulation for photographers.
Learn how you can easily recreate the making of a photo shoot even though the studio equipment used for the initial setup is already back in storage?
We show you, for example, how you can view the lighting setup on your blog from any possible perspective. Every newbie and curious photographer is incredibly interested to find out what it looks like “behind the scenes” of a studio setting and to learn about the specific light arrangements that were applied.
So what is actually the best way of teaching the simple basics of photography?
This article is especially for lecturers, advisors, teachers, authors, workshop leaders and photographers with a blog.
Here we demonstrate how you can make perfect use of set.a.light 3D in your respective field.
Before the real photo shoot start, the theoretic basics can be communicated easier by means of set.a.light 3D. What is the aperture? Which effect does the depth of field have? What is the golden ratio? What is the difference between hard and soft light formers and how do you apply them? How does a colored background affect the overall mood of your image?
All of these basics can be conveniently demonstrated in a vivid live presentation with set.a.light 3D. Just connect your computer to a projector and you are ready to teach your class. You will be able to respond to your students questions in a fast and flexible manner. Photographic knowledge could hardly be communicated in any easier or more effective way.
After the workshop, the participants will be very grateful when you provide them with an additional take-home goodie in form of an awesome making of documentation that contains the detailed setup info of the previously created studio lighting settings. On top of this, you can also grant your participants access to the set file including all lighting setups that were taught. This enables them to reflect on the lessons learned at home and use them as basis for their own photo shoots.
This way you achieve the highest value for your participants and elegantly set yourself apart from your competitors.
Important: set.a.light 3D does not need to be purchased in order to view set files. More details: HERE
In schools and during training, set.a.light 3D is your ideal sparring partner for tests and exams. You can provide your students with various exercises regarding certain light settings (i.e., “Use one light source to create a classic Rembrandt light and describe its typical characteristics.”). Let them solve those tasks by means of this software. Later on it will be very easy for the teacher to control whether the lighting design has been implemented correctly and if the desired image result has been achieved. This is also especially suitable for small schools that don’t have the necessary amount of studio rooms to let all students execute their designs at the same time.
You can even assign homework to your students as they will be able to conveniently do it on their PC at home. They now have a virtual studio at hand that they can work with to study the different outcomes of their settings. Information regarding the educational version can be found HERE
Another great plus for the software is that students automatically establish a huge repertoire of lighting setups due to their usage of set.a.light 3D.
Let’s start:
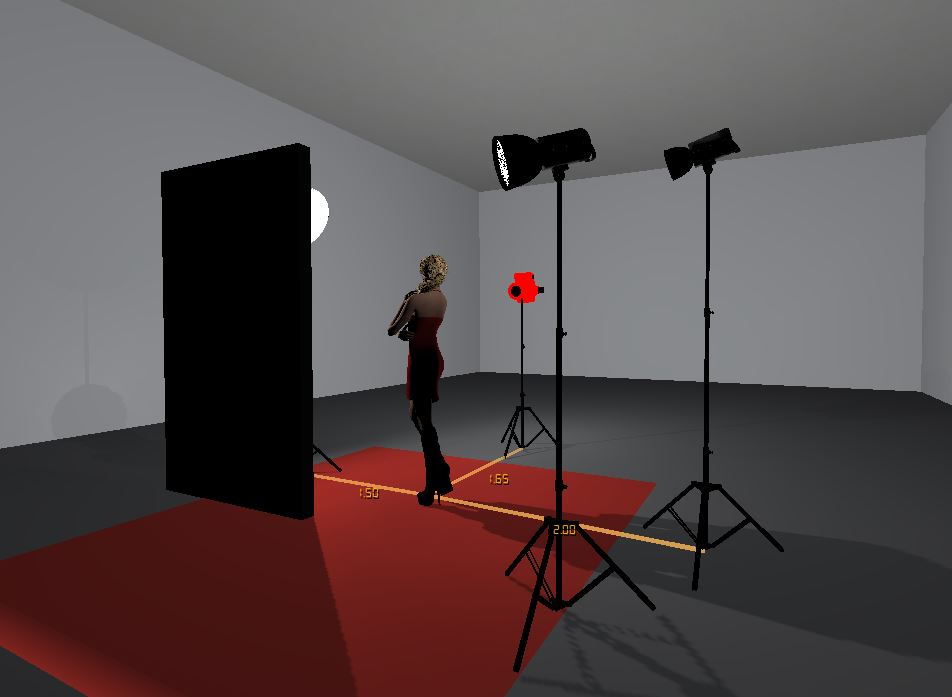
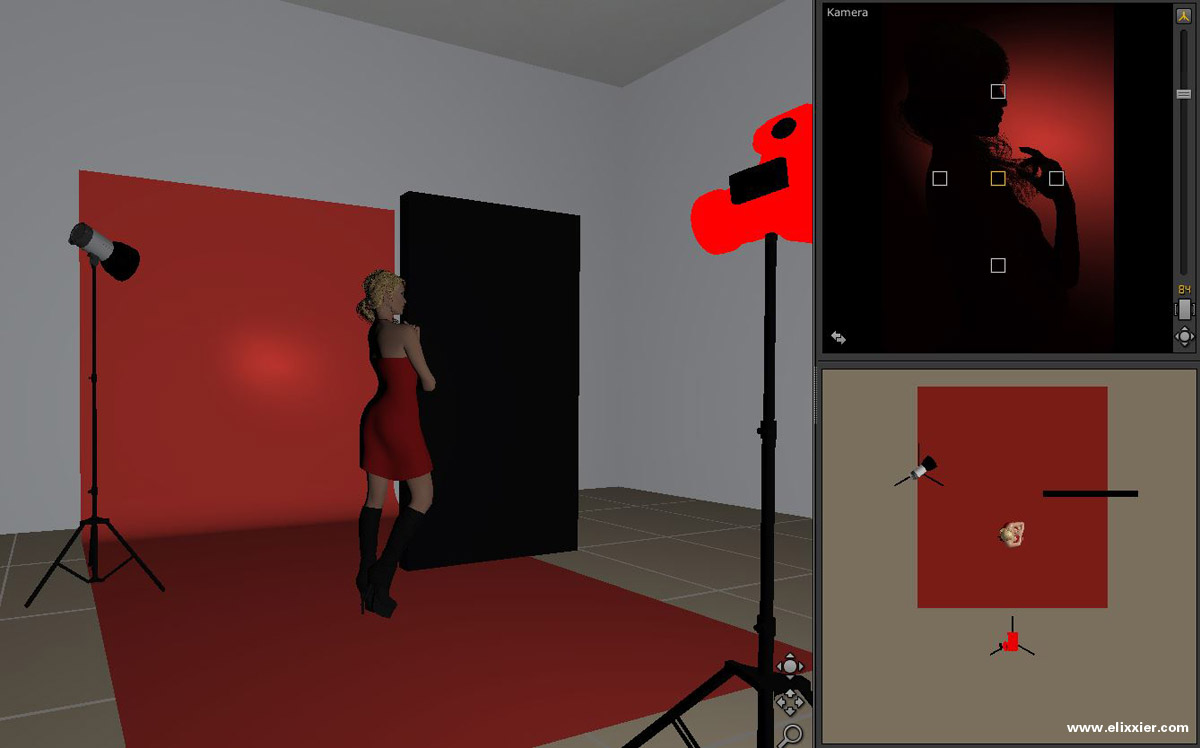
The following pictures were taken and rendered with a camera. In order to create a brighter surrounding for those images, an additional light source was installed high above the set. This light source of course has nothing to do with the actual light setting and only serves the purpose of a better setup illumination for the screenshot itself.
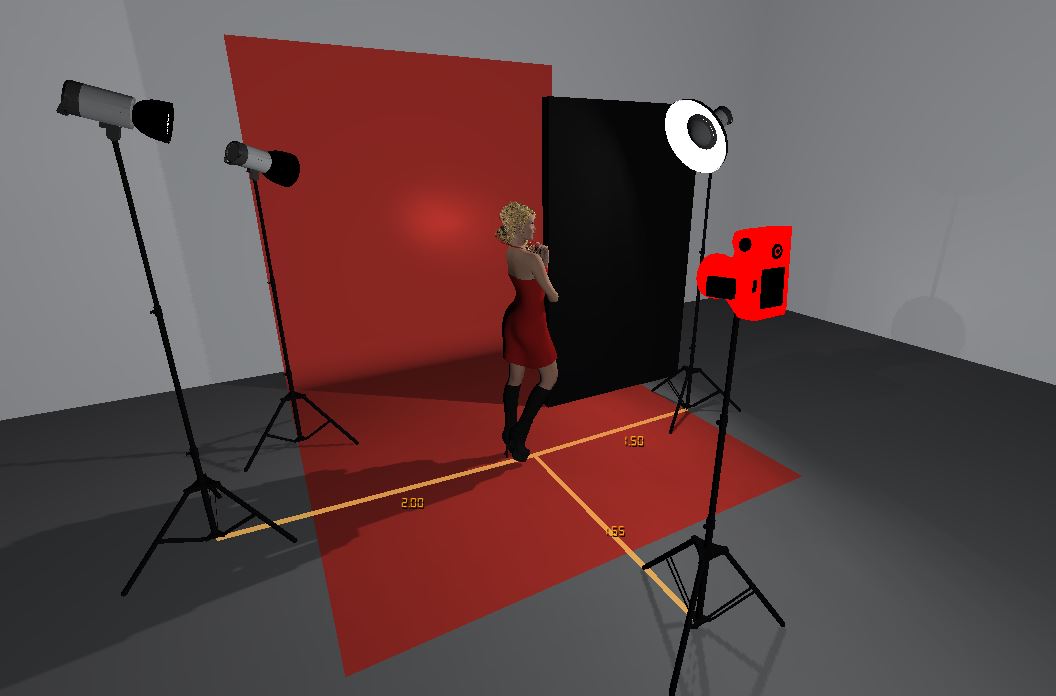
You’ll find the dummy camera in the props area. Exchange it with the red camera (main camera). Later on, this allows the viewer to clearly see the camera’s position. You can also use the red camera to take (and render) your making of pictures. To achieve great perspectives, an extreme wide-angle lens is your best bet.
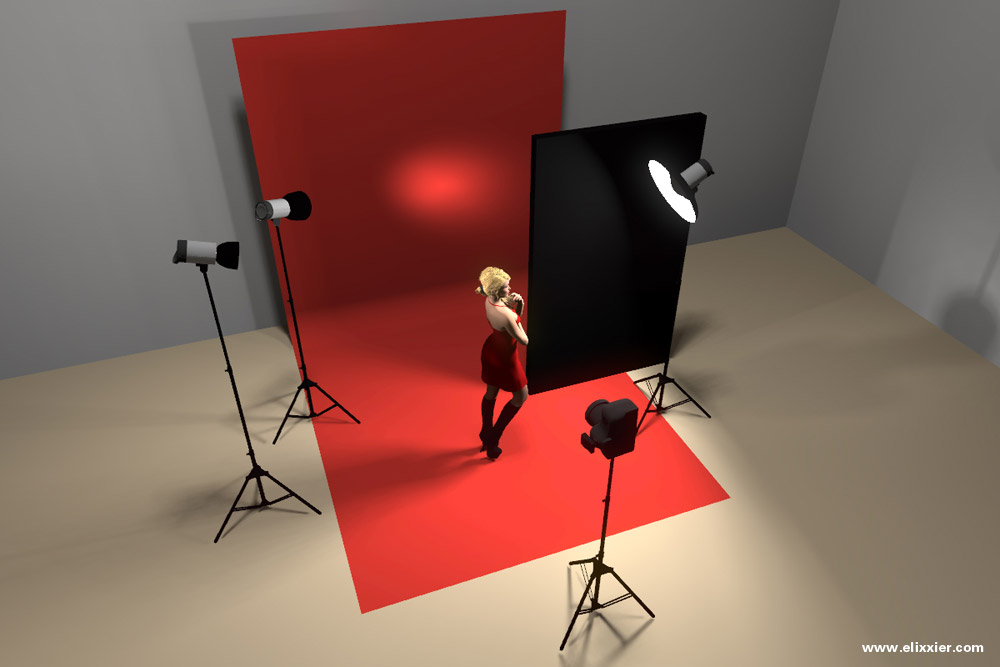
Setting viewed from the side – rendered

Setting with Wide Angle – rendered
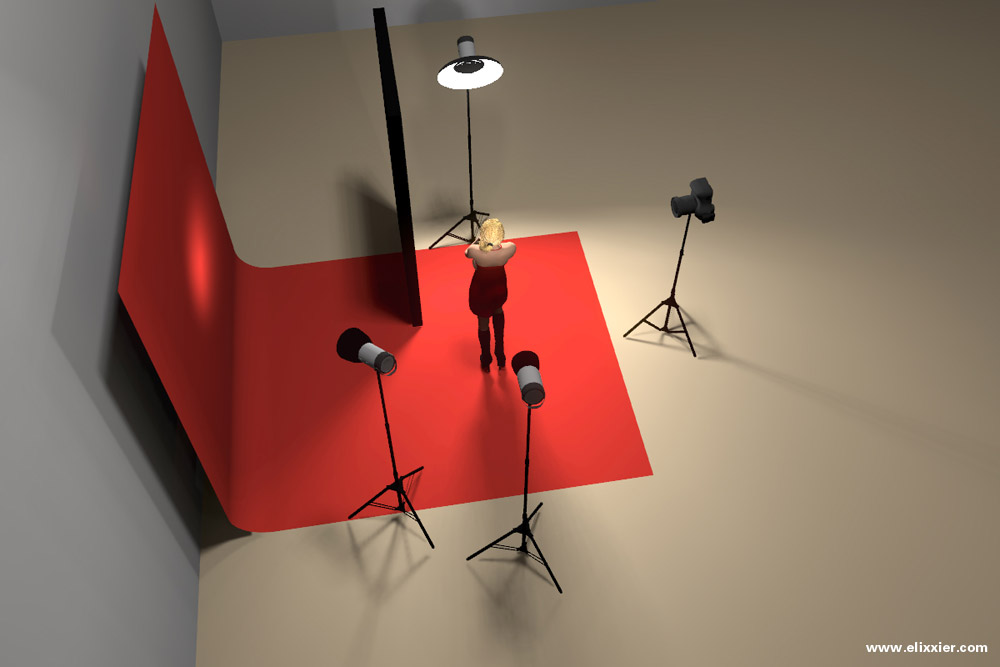
Setting viewed from the side – rendered

additional lighting to make the renderings better
As previously described, you can see the additional light source here that brightens the set for rendering.
Alternative: Screenshots directly created in set.a.light 3D:
Alternately you could also simply take screenshots of the studio area and use those for your documentation.
– The advantage of it is that it works even faster and the dimensioning stays visible.
– The disadvantage is that the quality of these screenshots is most of the time not as nice as when you do the rendering with the camera. In order to receive bright screenshots, you should adjust the studio lighting (located at the upper left of the studio area) to a very bright setting.
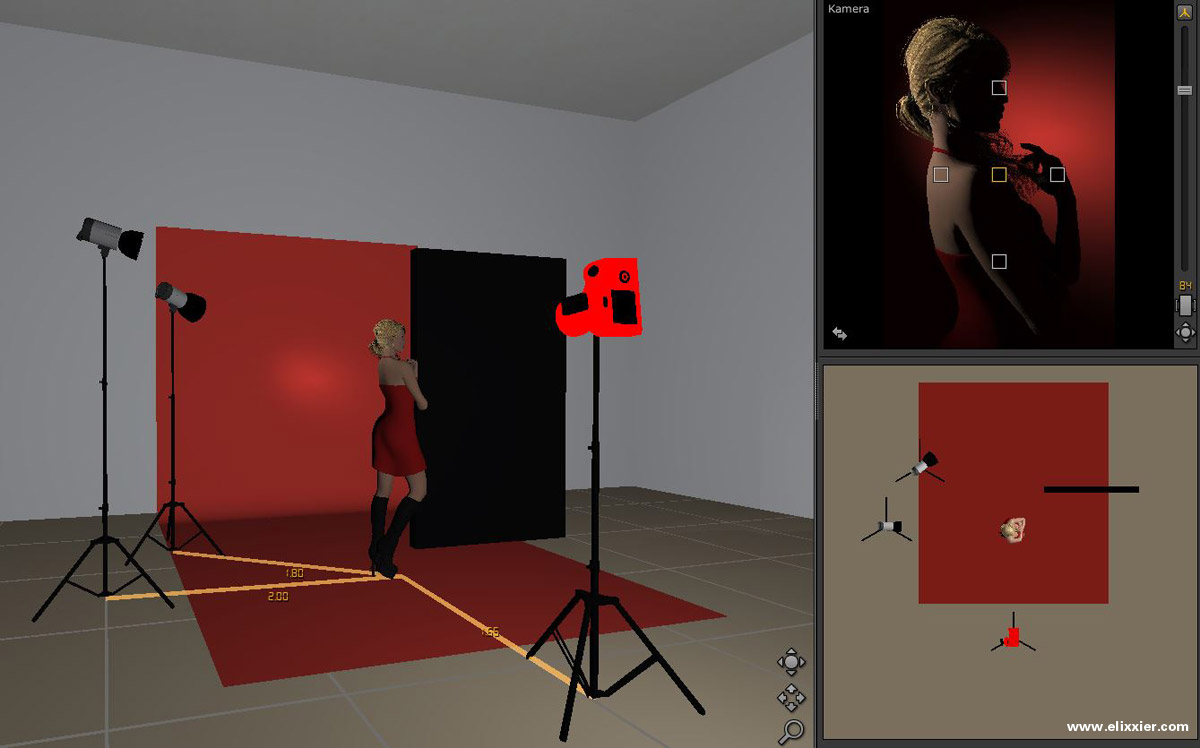
Screenshot of Studio View – from the front
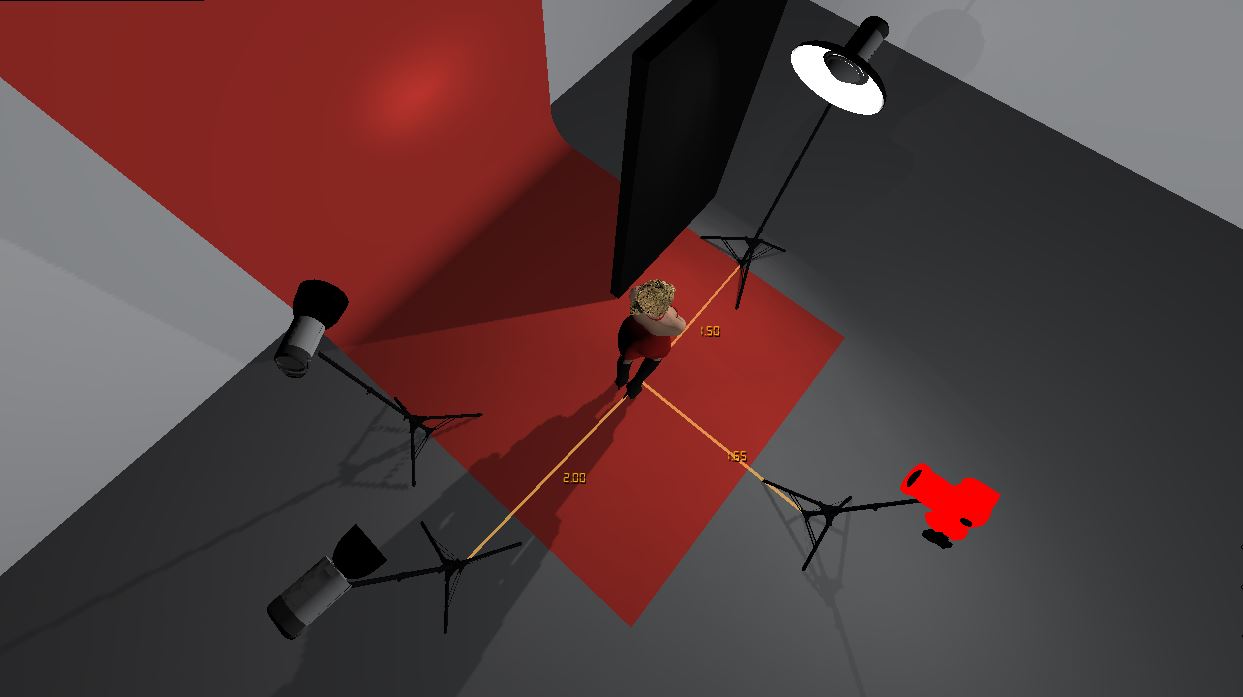
Screenshot of Studio View – from the top
Making of photos based on such very different and sometimes more extreme perspectives are hard to shoot in a real studio. However, these unusual perspectives help you to understand the lighting setup and can also show hidden (covered) equipment.
Screenshot of Studio View – from the back
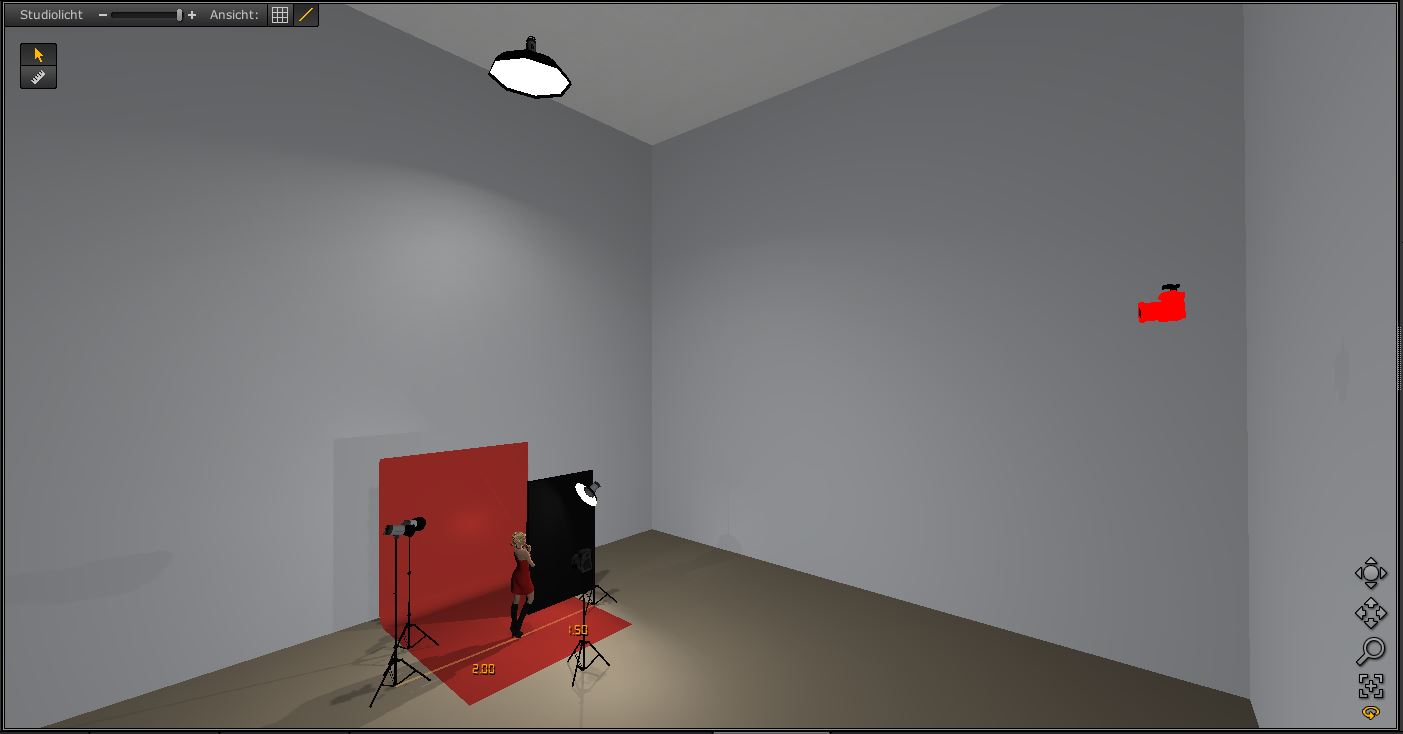
Screenshot with the additional lighting for rendering

Screenshot from the Exporter
The screenshot taken by the Setplan Exporter is especially important because it reveals the studio setup from top. The Dimensioning Tool is also extremely valuable here. This presentation alone is often times all you need to explain the design of the lighting setup at hand.
Setplan:
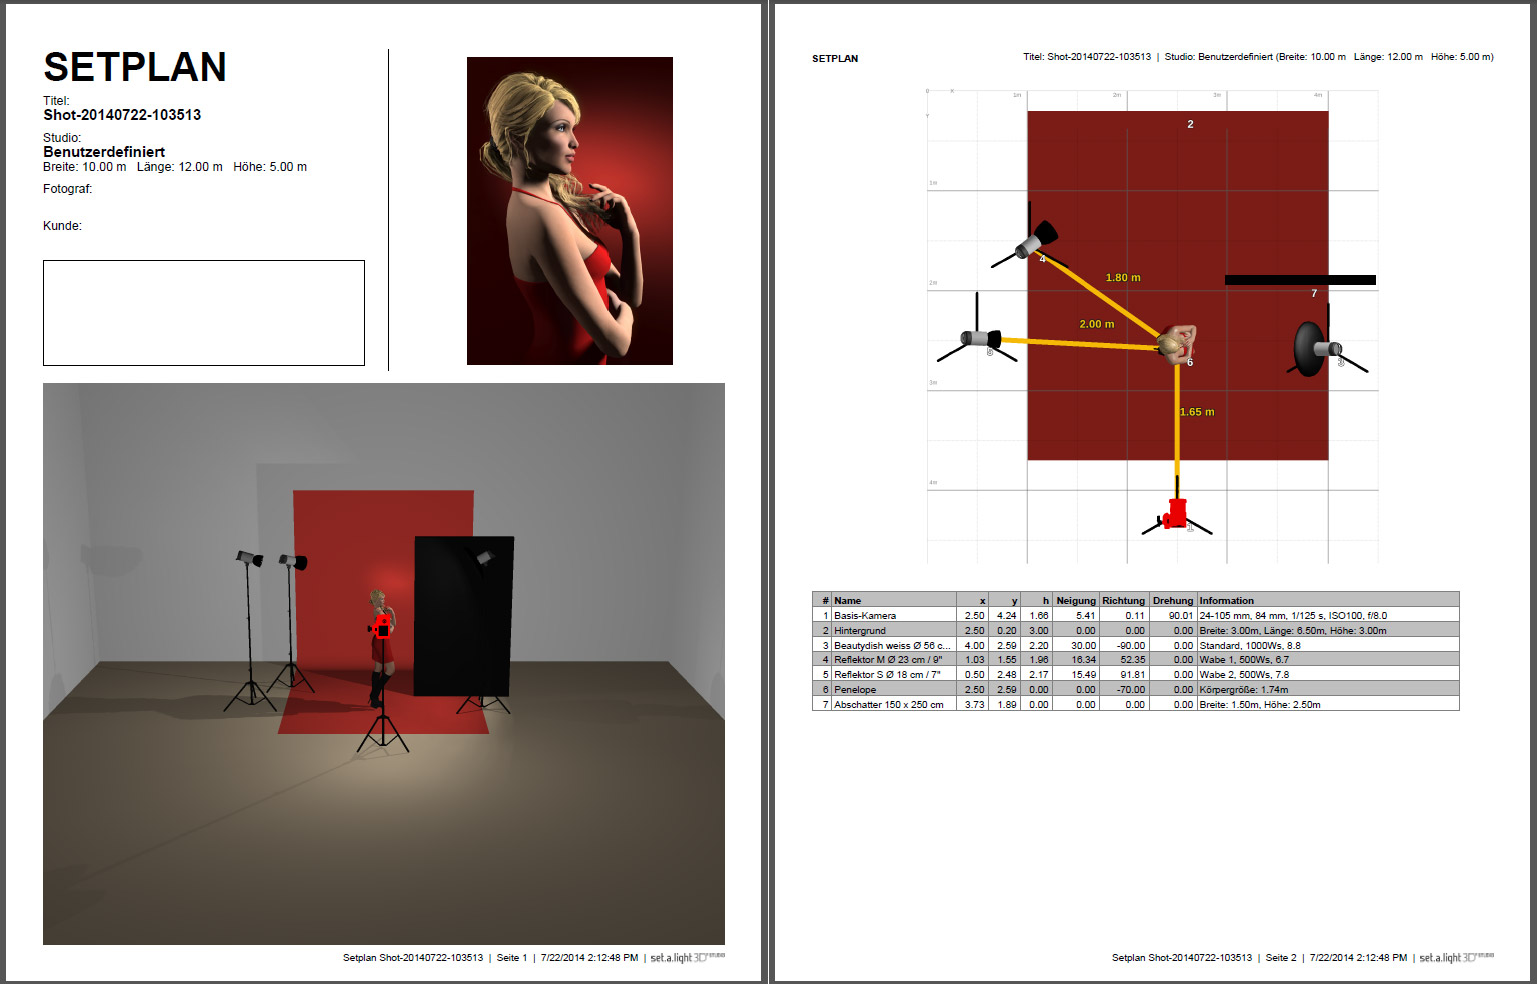
Two-sided PDF Setplan as an expression of school records.
Once the PDF set plan has been exported, it is available as a document and includes all details regarding the shoot. With this plan, the simulated photo can be replicated in the real studio at lightning speed.
Important Note:
The PDF set plan graphics can also be saved and used easily.
Open the PDF, mark the graphic by left clicking it with your mouse, then right click on it – and now you can select the option “Copy Image”. Now open Photoshop and choose “File” -> “New” and insert the graphic there. These PDF set plan graphics (i.e. the set view from top on page 2) have a higher resolution, meaning they are well suited for printing purposes.
This Is How You Create Well Laid Out Screenshots – No Further Post-Treatment Necessary:
By taking a picture of all three marked areas of the software at once, documentations can be created in no time without any further post-treatment in Photoshop.

Studio Overview – Setting – Result
1. Minimize the bar on the bottom to get the maximum area for your screenshot.
2. Widen the camera and studio setup section (Top View) to its maximum.
3. Use the mouse wheel to zoom into the studio setup (Top View) and move it with the right mouse button until it fits.
And the final step is the creation of your screenshot (we have chosen to extract the yellow framed area).
If the final image is supposed to be more paramount, you can exchange the studio view with the camera view (key “t”).
Screenshots:
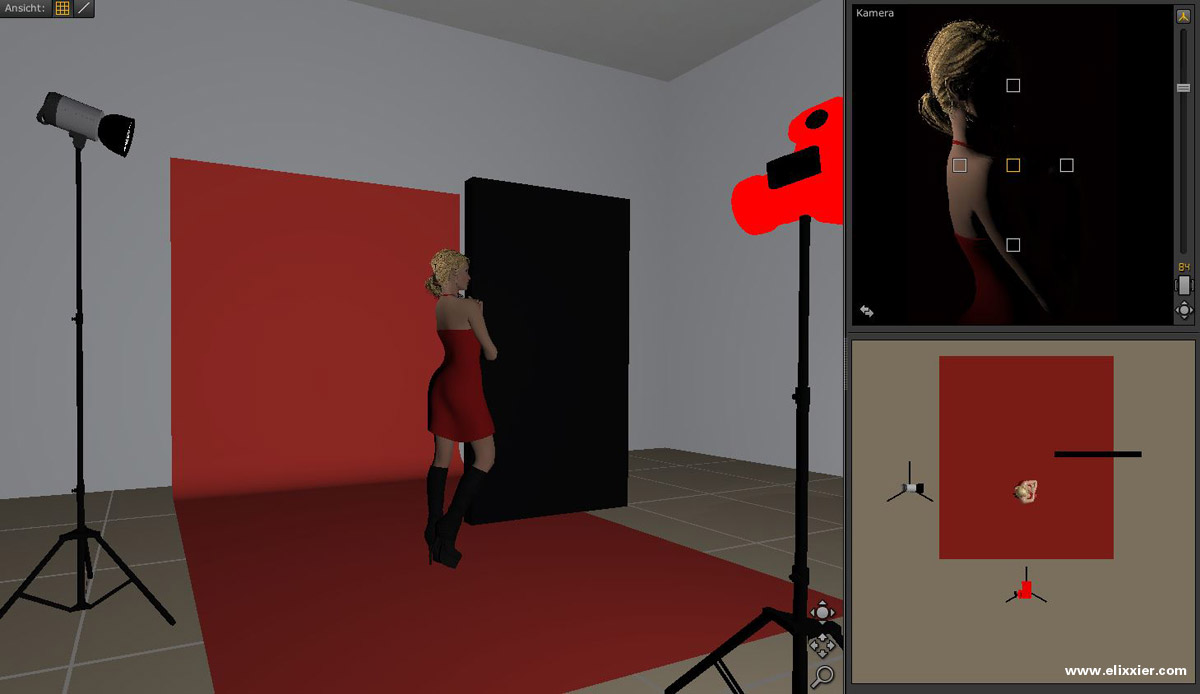
Hair light with Studio view
In addition to the outcome (top right), this screenshot also shows the set design (bottom right) and the view into the studio (left).

Main light with studio view
background light with studio view,
Hair and background light with studio view
Additional dimensional lines were drawn for this screenshot.
Lighting Effect Overview:
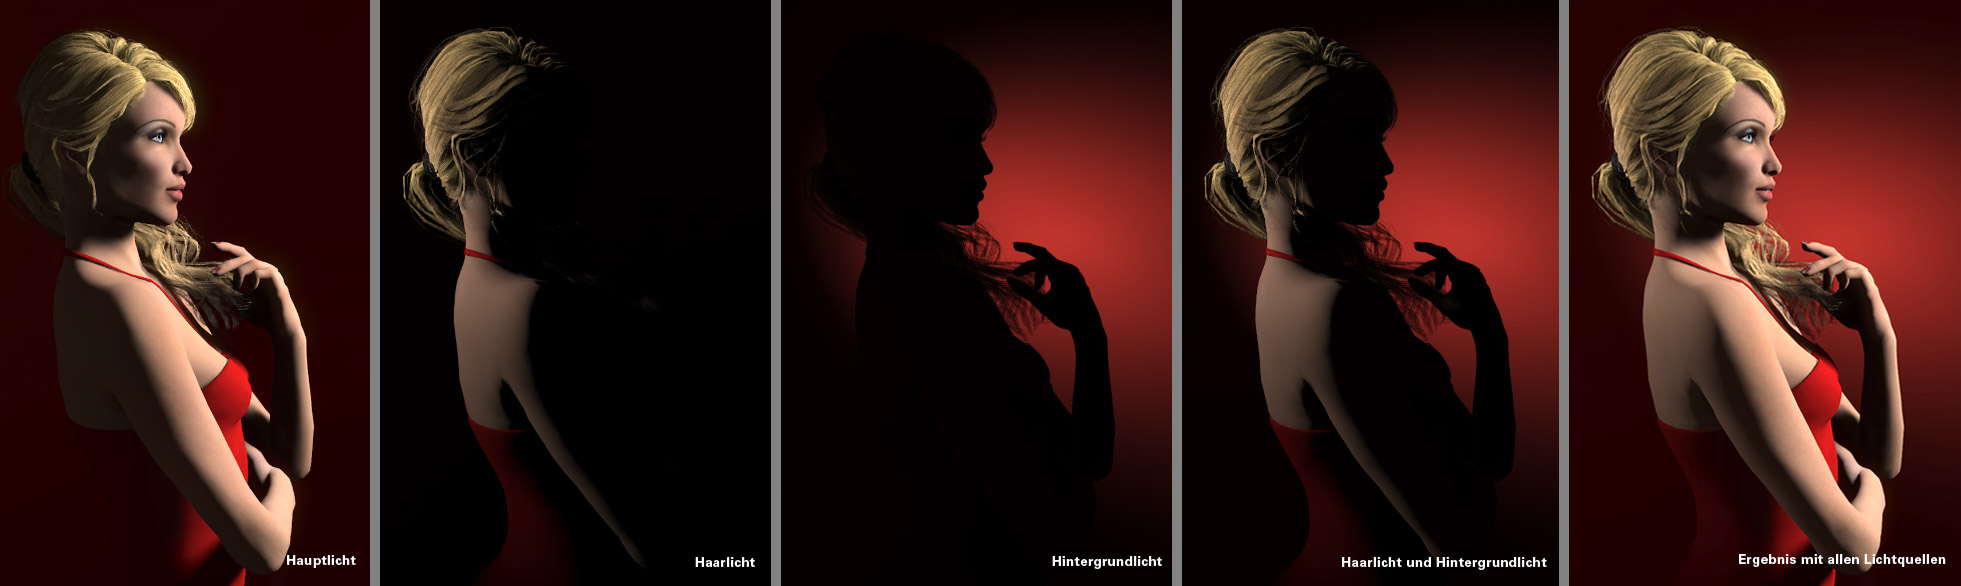
Lighting effect of single light sources (key light, hair light, background light , hair and background light – image result)
Here we see the lighting effect of each single light source used for this light setting.
In the educational process of becoming a photographer, it is an absolute key factor and crucial to understand how single light sources work, what kind of effects can be achieved with them and why they need to be positioned in a certain way.
Example: Effect of Hair Color
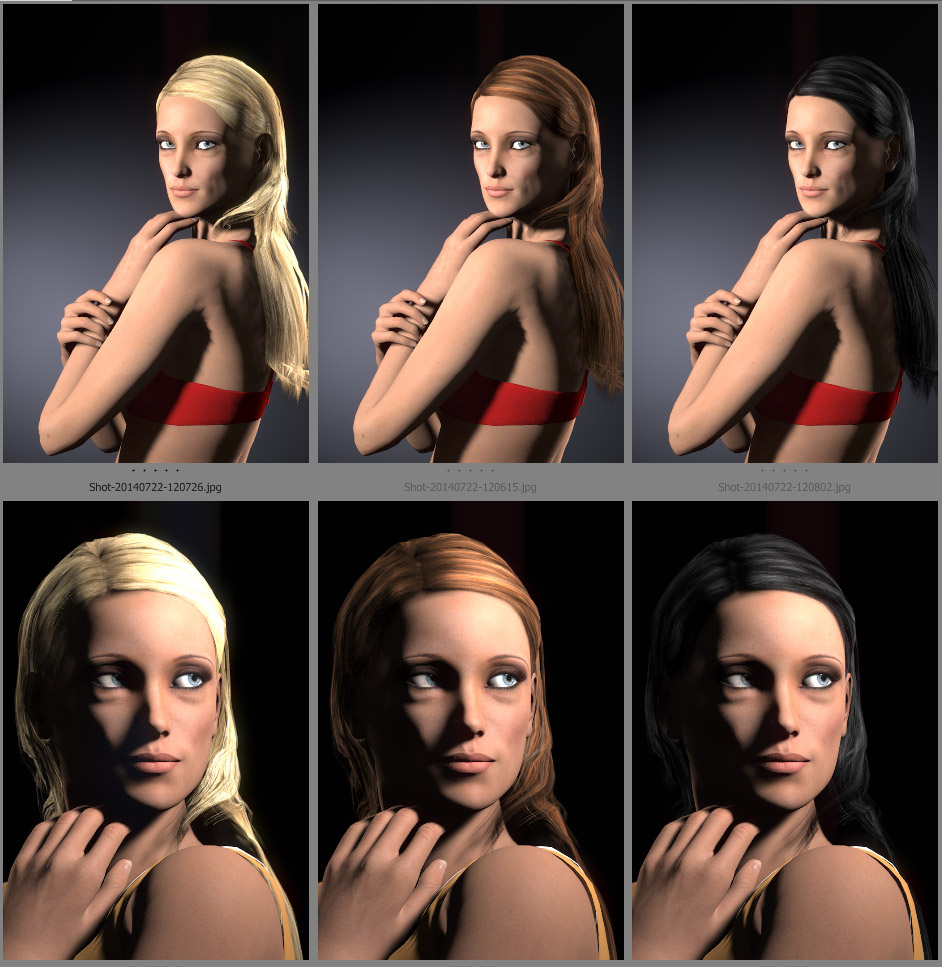
Auswirkung der Haarfarbe auf den Lichtaufbau.
Of course there are countless further areas of application. The examples displayed here are supposed to spark your inspiration and demonstrate the many possibilities that set.a.light 3D has to offer.
Have fun creating lots of cool and vivid documentations with set.a.light 3D!
Don’t wait any longer! Get in touch with us right away if you want to use set.a.light 3D at your school.
Your elixxier team
This post is also available in: German
I love it!
Great piece of software!
I’m a college professor teaching commercial photography and your studio software would be of great help. Please let me know how to acquire it.
I teach at:
CCAT, Puerto Rico
Sagrado Corazon University, Puerto Rico
InterAmerican University, Puerto Rico
Hello Anthony,
the order is very easy with us.
Please write us an email, we’ll help you right away :)
Best regards,
elixxier team