 elixxier – Photo Blog Light settings and lighting structures for studio and outdoor photography. Tips and tricks for set.a.light 3D – The photo studio and light simulation for photographers.
Improve Your Photography Skills – Secrets of the Inverse-Square Law of Light Revealed
In this blog post, I would like to share some insights with you regarding the connection of aperture and inverse-square law of light as well as their effects on light fall-off. Let me ease you into this topic by explaining the aperture first.
Aperture Stops (f-Stops)
Switching from the maximum aperture to the next smaller one reduces the incident amount of light that enters your lens. In addition, the aperture diameter is lowered by a factor of 1/√2 each time which also cuts the lens surface and therefore the amount of light in half. Thanks to this gradation, we simply adjust the shutter speed and aperture to the existing lighting: Each f-number (f-stop) is a result of the previous one, multiplied by √2=1,414… At the same time, we round up the result so that, for example, aperture 4 – as per the calculation of 4 x 1.4 – turns into the next higher aperture value of 5.6. Here is an excerpt of this well-known sequence which reads as follows:
f/1 f/1.4 f/2 f/2.8 f/4 f/5.6 f/8 f/11 f/16 f/22 f/32
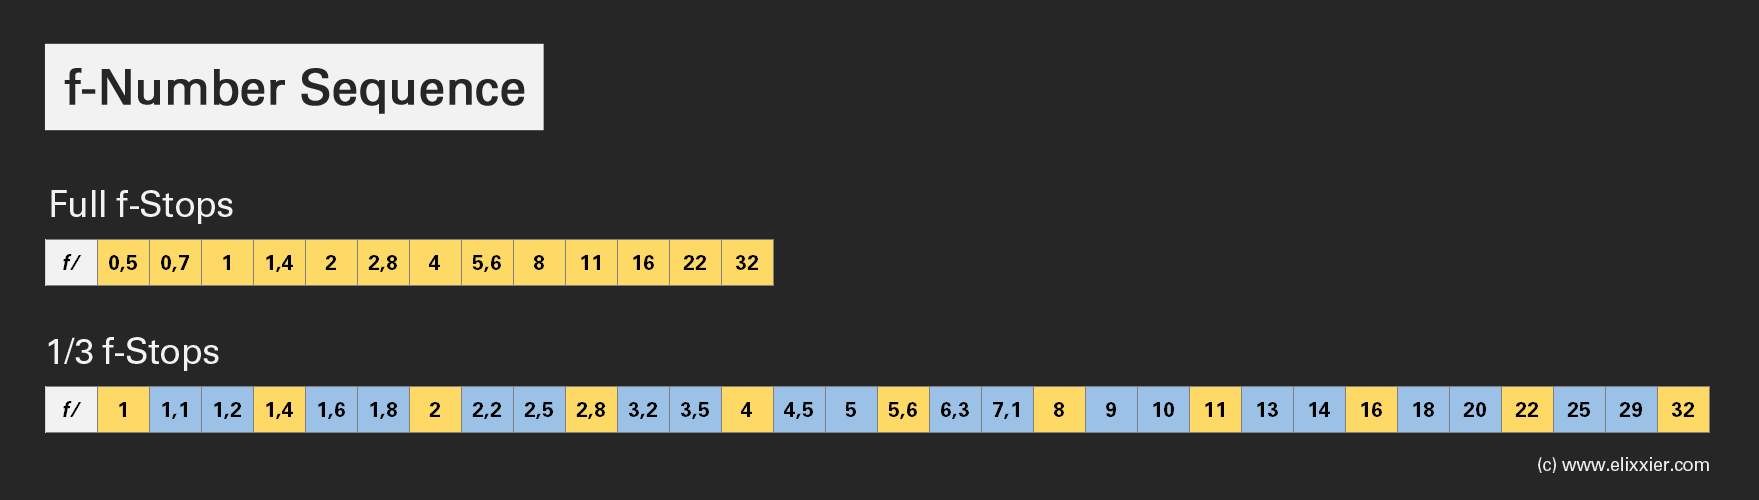
In rare cases there are also macro lenses with a maximum f-number of 45. Since macro lenses are often times placed very close to the subject, the huge f-number allows you to reach a good depth of field (despite the closeness). Too small f-numbers would oftentimes lead to a too low focus range
The Inverse-Square Law of Light
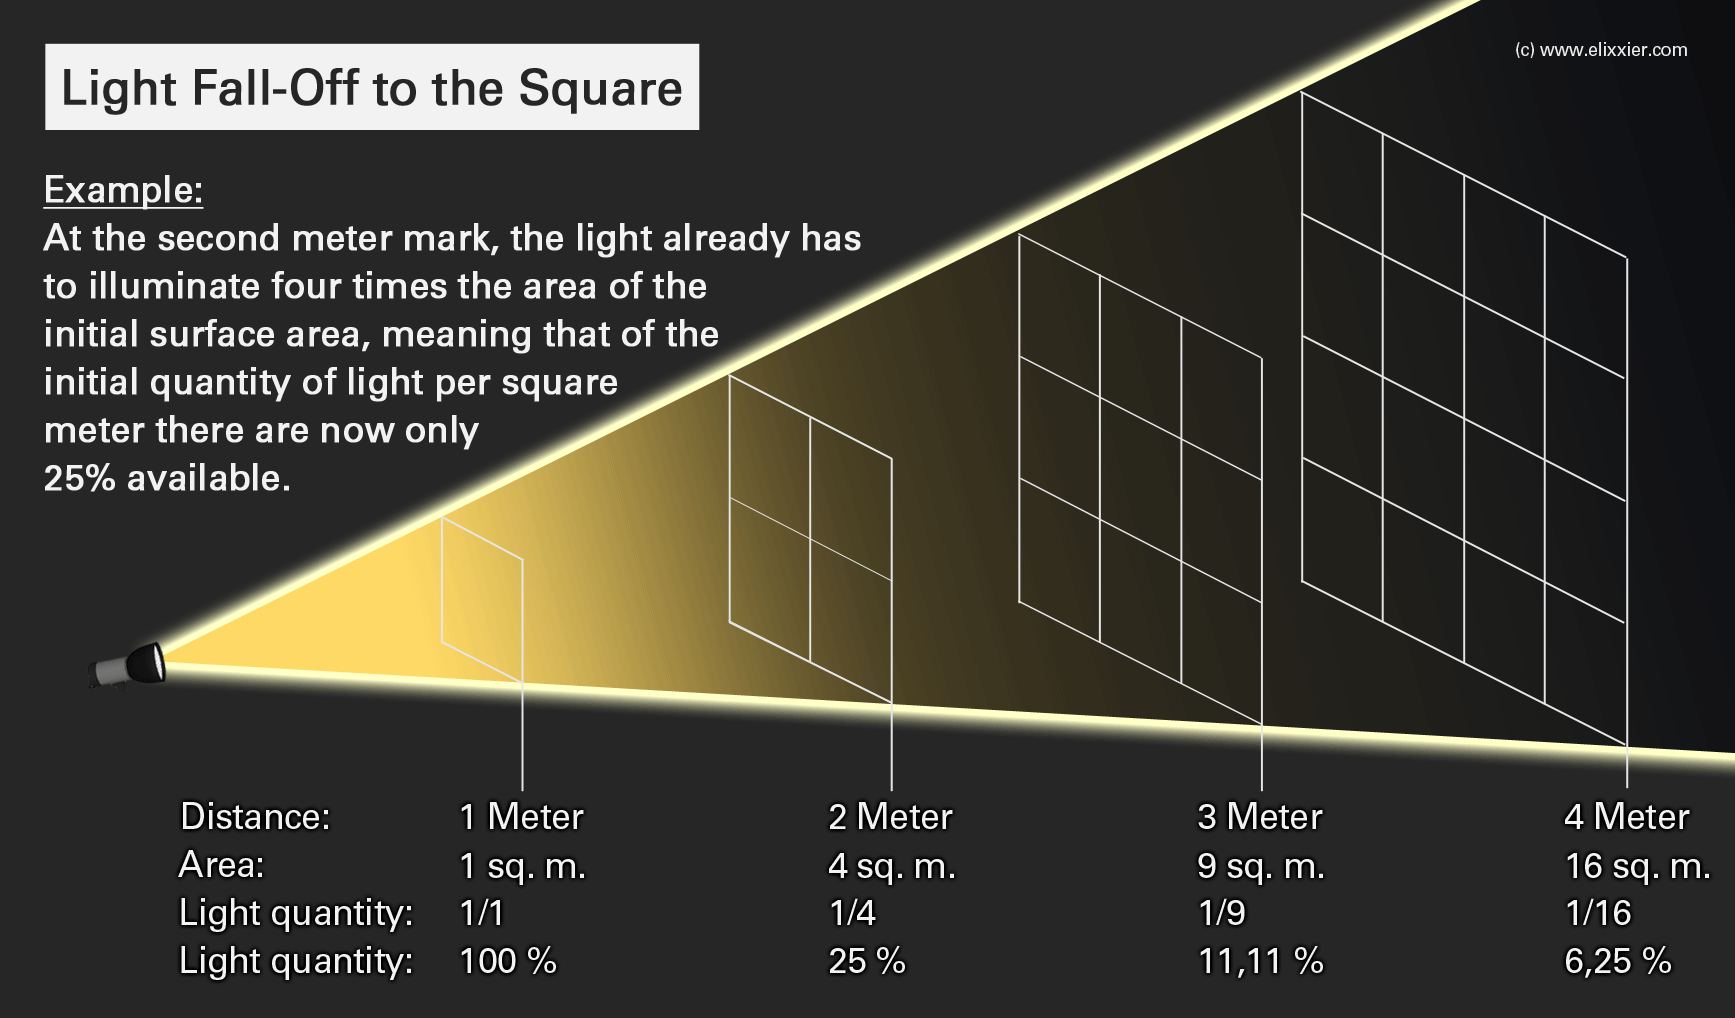
We create the ideal lighting for each scenario with the inverse-square law. The inverse-square law works as follows: If you double the distance between subject and light source, it illuminates a surface area four times greater than the one before. In general, we therefore multiply the distance with itself in order to calculate the enlargement of that surface area. However, a larger surface area leads to a light intensity that is inversely proportional to the square of the distance – since the same amount of light has to be distributed onto a larger surface area respectively. Therefore, we see light fall-off, meaning a decrease of light intensity.
In technical terms the inverse-square law reads as follows: The energy (in our case: light intensity) at location A (subject area) decreases inversely proportional to the square of A’s distance to the energy source (for example, our flash head).
Light Fall-Off to the Square: The Inverse-Square Law in Detail
It only requires some basic math knowledge to write down the inverse-square law (its formula). However, the physics behind it is generally very complex. Because of this, we are only going to approach this law in an illustrative way and from the viewpoint of photography. For this reason, we are referring to the exposure of the image sensor or film footage – and respectively to the lighting of the subject. When using flash and spotlight, the inverse-square law comes in especially handy.

The light intensity, for example, quadruples (4) upon halving (1/2) the distance to the light source and subject. Respectively, the light intensity decreases to a quarter if we double the distance. According to this, these exemplary pairs of digits are valid (distance: 3-fold; intensity: 1/9) and (4; 1/16) if we multiply the distance respectively.
In general, the inverse-square law explains the disproportionate light fall-off with increasing distance of the subject to the light source. This knowledge helps us to better understand how to correlate light and lighting with the distance to the subject and its brightness.

Practical Application
Because of the inverse-square relationship of the described law, the light intensity drops rather heavily when the subject is first moved further away from the light source. After that, it continuously decreases on a weaker level. For example: If we increase the distance between light source and subject from 1 meter to 2 meters, 75 percent of light intensity are lost on the subject. But when we increase the distance from 4 to 10 meters, we only lose 5 percent.
So the light intensity close to the light source has especially high values. But in the distance, this intensity only reaches a tiny value. Here’s how we create the appropriate lighting: At constant shutter speed the f-value increases, the closer the subject gets to the light source – the smaller the aperture, the less light enters into the camera. Vice versa, the f-value decreases as the distance of the subject to the light source increases. In both cases the respective shots almost look the same: Simply because the same amount of light enters through the lens.
This is how we theoretically create the correct f-value for each combination of distance, light intensity and shutter speed.
Only Illuminate One Subject
For static subjects, one fixed f-value is sufficient. Moving subjects, however, require flexible f-values, especially when they are very close to the light source: Due to the inverse-square law, a small change of the distance to the light source leads to an extreme change of lighting. In turn, one fixed f-value is sufficient for a long distance subject – even if it moves around on a larger scale.
Illumination of a Few Subjects
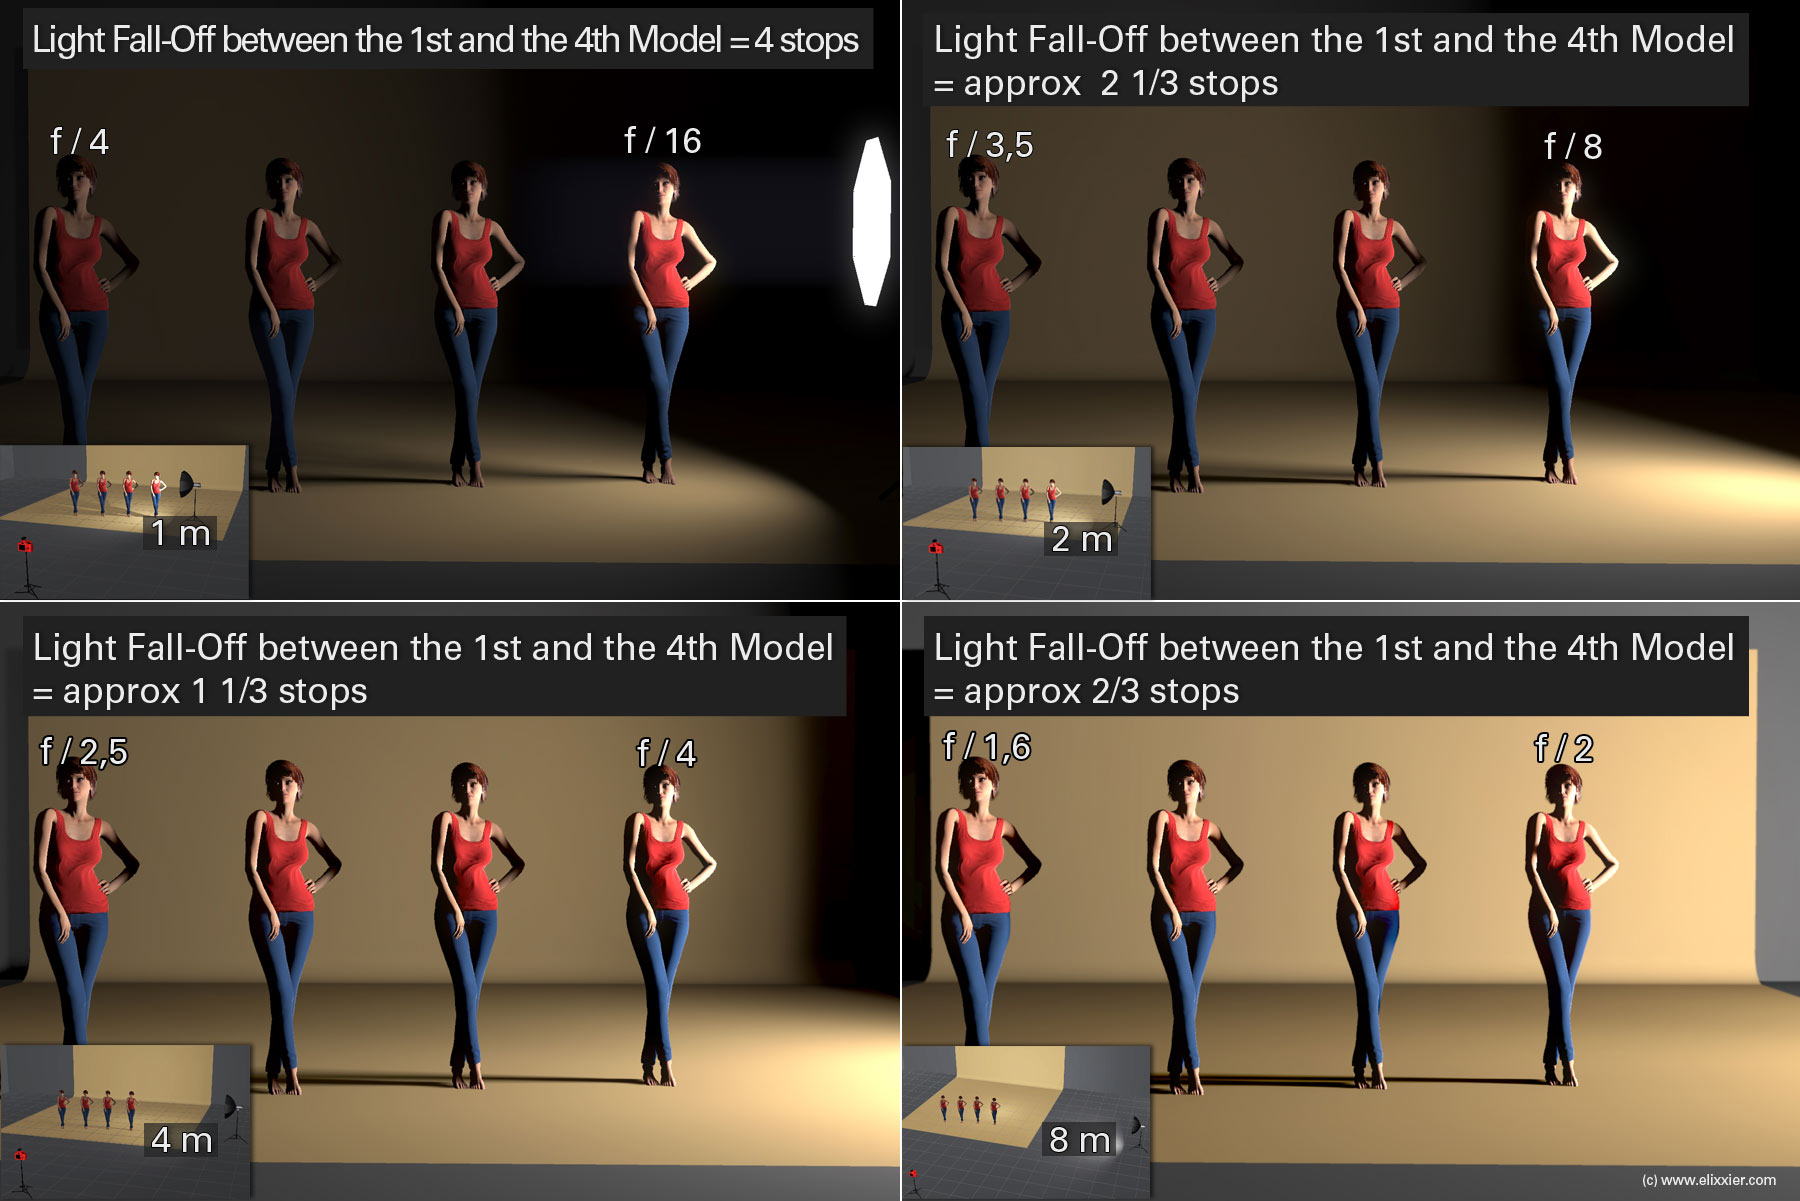
Sometimes all subjects are located rather close to the light source in form of a spotlight or the like. In such cases, the front subject may be overexposed whereas the one in the back remains underexposed. For example, three subjects distributed behind one another cross the f-values within the range of f/22 and f/11. There is an easy solution to this problem that allows you to evenly illuminate all subjects: Simply place all subjects further away from the light source. This way, their relative sizes to one another remain the same and all of them only need one and the same f-value for a good exposure such as f/4, for example.
You can see the differences very well in our example -> If the lighting is placed at a distance of 8 meters to the first model, the light fall-off to the 4th model is only about 2/3 stops. However, if you were to place the light source only 2 meters away, the difference in brightness between the 1st and 4th model would be a total of 2 1/3 stops (e.g., f-stop 8 -> 3.5)!
Special Problem: Correctly Illuminate Backgrounds
In our images, we often times of course also wish to see contrasts instead of uniform brightness: We have a desire for lighter and darker parts of the image. For example, we are in need of a rather dark background against which our attractive model will be illuminated in a correct and bright way – close to the light source! The quadratic light fall-off to the further away background then leads to the underexposed and therefore dark background. This is how strong contrast works to our advantage thanks to the inverse-square law.
In turn, we also use this “inverse-square law” when we desire an evenly and well illuminated model and background: We then place the light source in a significant distance to both the model and background – this way we achieve a very even illumination.
As you can see in the example below, it is already sufficient to place the light source in a distance of 4 meters to the model in order to evenly illuminate both the model and background. The difference between model and background is only 1 stops now. If the model was yet placed closer against the background, the light fall-off could be reduced even further.

By the way, if the light source is placed too close to the model (only 1 meter here) as seen in the upper example, the light fall-off on the model’s body is already so huge that – in case of a full body shot – the legs would be underexposed. Therefore, such a positioning is only worth to be considered for a portrait shot.
Connection between Flash Head – Output – ISO – Aperture
In order to see the dependencies even better, we have set as many values as possible in reference to one another as depicted in the graphic illustration below.

The Graphic Explained:
We are presuming a 1000 Ws flash head with a gigantic control range of 1-10. The aperture and ISO value have been chosen exemplary in order to depict the dependency between these figures. The ISO or aperture value (meaning just one of these two values) needs to be set according to the chart in order to always achieve the same illumination (brightness) of the subject while the flash head’s output controller is being adjusted.
It immediately catches the eye is that the flash head’s output power (watt/seconds) has to be doubled per f-stop. This way, the output in the upper range between 9 and 10 is increased by a total of 500 watts whereas the output in the lower range between 1 and 2 only changes by approx. 0.2 watts. Now by taking a look at these rather extreme output differences you will understand what great development work it took the flash head manufacturers in order to make all his possible with such outstandingly high precision.
Conclusion:
What should you absolutely keep in mind?
Regarding the Aperture:
The difference from one f-stop to the next always either leads to a doubling or halving of brightness. For the flash head this also always means a doubling or halving of output (Ws). For example, if the flash head’s output is changed from 5 to 6, then this is exactly equal to one f-stop.
Regarding the Distance:
If an object is placed close to the light source, the light fall-off on said object is very high in comparison to the background. Light fall-off to the square! When doubling the distance to the object, 4-times the light energy is required in order to balance the difference in brightness.
Doubling/Halving of distance is always equal to 2 f-stops regarding the difference of brightness!
A longer distance between light source and subject leads to a more uniform illumination of both the subject and background because the light fall-off keeps decreasing as the distance increases. Therefore, this effect has a huge influence on lighting design.
Here is the chart for a quick overview once again:
Experiment with distances, the aperture and light output at your next shoot – or in set.a.light 3D. It’s worth it! Once you have fully understood the correlations between distance, aperture and light fall-off, you can easily use those effects in order to improve your lighting design and selectively control it.
Enjoy it! :)
Your Johannes Dauner
PS: You are welcome to share this as well as all other posts with your friends and fellow photography enthusiasts!
This post is also available in: German