 elixxier – Photo Blog Light settings and lighting structures for studio and outdoor photography. Tips and tricks for set.a.light 3D – The photo studio and light simulation for photographers.

What is the Light Blaster anyway?
The Light Blaster is a flash-based image projector (slide projector attachment for hot shoe strobes). You can use it to project images into the room, much like with a beamer. For the projection slides (35 mm) are used. Thus, the image that you want to project must first be exposed on a “real” slide.

What do you need?
Of course the Light Blaster, a flash (there is also an adapter for a studio flash), a lens and of course a slide with the image.

How does the Light Blaster work?
Push the hot shoes strobe into the Light Blaster and fasten it with a Velcro tape. Then mount a lens on the bayonet mount (the Blaster is only available for Canon lenses, for Nikon and co. you need an adapter). Now you put the slide into the holder and off you go. With the lens the image size and the sharpness can be adjusted. The aperture of the lens influences the brightness of the image. It is therefore advisable to use a bright lens (e.g. F 1.4). A lot of light is lost due to the slide and the lens, consider this for your set setup.
On the manufacturer website you can find all detailed about the Light Blaster:
https://spekular.com/product/light-blaster/
Creative work with the Light Blaster
There are many ways to let one’s own creativity flow into a picture. One of them is the Light Blaster, which allows you to flash (project) images onto a background or your model.
How you can use a projection in a photo shoot:
- Focused on the model + background
- Just focused on the model
- Just focused on the background
- As the only light source
- In combination with other light sources, additional projectors, strobes or ambient light
Example 1: Projection from above on the model

—> With this positioning the projection falls mainly on the model, because the Light Blaster is positioned from above and the distance between model and background is quite large.
Example 2: Frontal, slightly lateral projection

—> Here the projection not only hits the model, but also the background. Since there is still some distance between model and background, a large silhouette of the model appears on the background. The silhouette can be used to create depth (and excitement) in the image.
Example 3: Background projection + separate illumination of the model
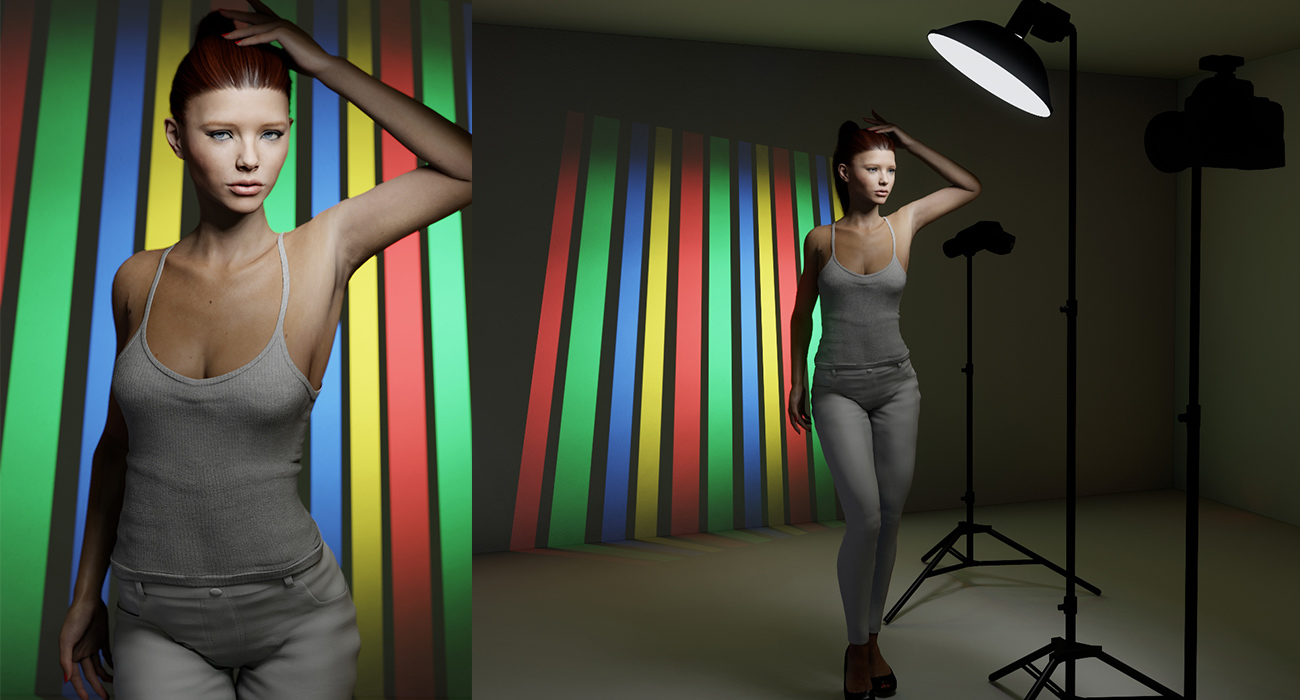
—> This example illustrates how you can easily turn a white background into something completely new. The Light Blaster was placed behind the model. Due to the small focal length the subject can even be projected over a large area, although the Light Blaster is very close to the background. The model was illuminated separately.
Even small changes in the camera perspective can have a big impact on the image. So interesting combinations can be created by chance. This requires trial and error and experimentation.
Since, as mentioned above, the Light Blaster loses a lot of light and can therefore be much darker in relation to other flashes in the set, it is advisable to work additionally with e.g. a continuous light (pay attention to the colour temperature). It is essential to find the right balance between the lights – and you can try that out perfectly in set.a.light 3D. With partial lighting you can also “erase” parts of the projection, for example by directing light at the model’s face.
Tips for working with the Light Blaster:
1. The brighter the slide, the more light can shine through it and the brighter the object/model/background will be illuminated. The brighter the background on which the projection is made, the better the projection is visible.
2. Also pay attention to the shadow which the object or model illuminated with the projection may cast as a silhouette on the background. Of course you can also use the shadow as a design element. But if you want to avoid shadows on the projection, place your model either close to the background or place the Light Blaster and the camera in one line.
3. Play with the size of the projection surface and select the focal length purposeful ( by the lens, which is fastened to the Light Blaster) to avoid distortions or to use them purposeful.
4. Play with the focus, thus sharpness respectively blur of the motive. This can lead you to an even more exciting result.
5. If necessary, bring an additional coloured gel into play. Exciting effects can be achieved by combining projection and colour, as the colours add up.
6. Make sure that the colors in your set (e.g. the model’s clothes) and the colors of your motive are in harmony or contrast with each other to get a coherent overall look.
How does the Light Blaster work in set.a.light 3D V2.0?

Of course like in reality :-)
You can find the Light Blaster in the tab “Speedlights” of the studio library below.

Just place it in the scene as usual. As long as it’s selected, you’ll find the adjustment possibilities on the left side in the detailed settings. Now select your speedlight as light source (which you have certainly created already). In the image template you will find some presets with which you can start right away or you can add your own image. It is ideal, if you use a jpg file with a maximum of 2048 px long edge in the format 2:3..
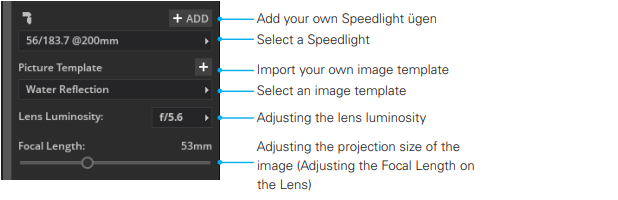
Now select the aperture of the lens you want to use, e.g. F1.8 (for a 24-105mm lens it would be e.g. F4). Please note that the light intensity has a big influence on the brightness of the projected image.
With the focal length you can now adjust the size of the image. Also pay attention here, the larger the section, the darker the image will be. The light of the speedlight has to illuminate a larger and larger area.
As long as you don’t activate “use manual focus”, the Light Blaster automatically focuses in the center of the image (where the laser pointer hits). If you activate “use manual focus”, you can set the focus point yourself.

It’s your turn!
It is best to experiment in set.a.light 3D with the existing presets and get to know the Light Blaster. To make it even easier for you, you can download a few ready-made setups below.

Here you can download the .set and experiment with it
Download:
Example-Light-Blaster-Setups.set
Note: Please start set.a.light 3D after the download and open the file from there! The file cannot be opened with a double click on the Mac.
This post is also available in: German