 elixxier – Photo Blog Light settings and lighting structures for studio and outdoor photography. Tips and tricks for set.a.light 3D – The photo studio and light simulation for photographers.

You should always have a plan in mind before you’d take your expensive camera and widely start shooting. How would you like your desired picture to look like? A good plan is more than half the battle and as well kepps you from having hundreds of unused pictures on your SD card or computer. Strt working more effectively! The preparing phase takes, in relation to the rest of your project, the biggest amount of time and should be done carefully and slowly. How do you want to get a great photo without planning on your beautiful model, creative clothing, good make-up and a perfect lighting setup?
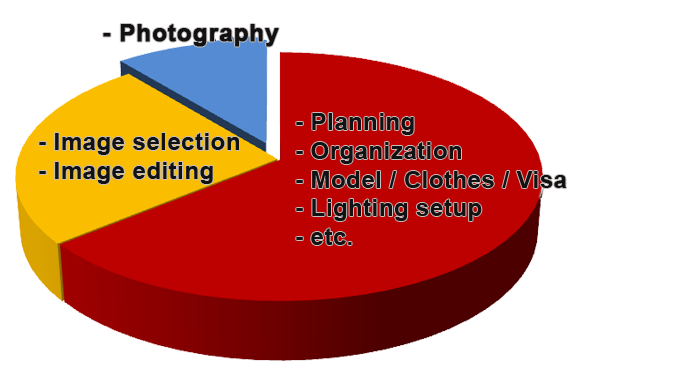
Our checklists for a successful shooting:
Planning/pre-meeting:
- Are you doing a free work/hobby shooting or is there a customer?
- Thinking about style and “language” of your picture.
- Magazines or other photographer’s work is a great inspirational source.
- What is it that makes your picture special? what do you want to achieve with it?
- Is it better when bodyparts of the model are shaved (arms, legs, …)?
- Do you want your man/men to have beards?
- Prepare a timetable/schedule!
- Release of your model, contracts (TFP, orPay)?
- How does your lighting look?
- Set up different lighting situations with set.a.light 3D and print out your final setting(s)!
By preparing your lighting in set.a.light 3D you’ll be able to start with your shooting right away and don’t have to try around with diffrent positions and lighting gear that much. Insecurity and nervousness are gone! By using your setplan you’ll stay calm and focused – get some great pictures!
Organization:
- Prepare your team and its members!
- Search for a location (Outdoor-, Indoor, or Studio?)!
- Get your accessoires and props!
- Do you already have the outfits for your models?
- Do I need the clothing to be ironed?
- Do you need special effects? Spray flask for wet skin and water drops, color gels, artificial eyelashes, …
Before you do the shooting:
- Drinks and small snacks get a better atmosphere on set.
- You have to know your equipment.
- Is everything you need working fine?
- Batteries?
- Enough storage and capacity for your camera?
- What flashes and light shapers do I need?
- Your setup should be ready before you start!
- Which objective/lens do I use?
- Telephoto lens
- Wide-angle lens
- Macro lens
- Fixed focal lenght
Your team:
- A make-up artist doesn’t only achieve a good look for the model, they also provide a good modd/atmosphere through chatting and talking.
- An assistant makes work easier. You’ll have “one more pair of eyes”. If he or she does his/her work well, you’ll be able to focus on taking the pictures.
- Be sure to communicate with your model and the team. What do wee have to look out for, what is important…?
Taking pictures:
- Get warmed up – the first few pictures are often just a method to get comfortable
- Is the outfit alright, does it fit?
- Are the make-up and hair alright, do they fit?
- Change those things up if they aren’t correctly in place!
- Take a small amount of time to go through your pictures.
- Is the light guiding good?
- What about the sharpness?
- The body position has a different impact in the picture then in reality. A professional model knows how to move and how to keep his/her body tension.
- Hobby-models need more instructions.
- A good look in the model’s eyes: Does it carry the message?
- Give instructions and with them safety to your model.
- Never touch the model without asking him/her whether that’s okay!
- Your conversational tone should be specific/determined, but friendly.
The perspective:
- The worm’s eye view makes objects/ models appear bigger and mightier.
- The bird’s eye view makes objects/ models appear smaller and more vulnerable.
- If you stay on the same height as your objects/ models they will look neutral and “equated”. They’re put on the same level as you.
- Do you have fore-/middle_/background, different levels of the elements in space or vanishing lines that create depth?
- Golden cut? Centered? Symmetrcial?
–> With some training and those checklists you’ll soon know most of these things by heart!
Let’s take a closer look at the effect of the picture and how it gets changed through the persepctive.

Perspective from below:
Seems more threatening and mighty. But it also stretches the models legs.
If you move backwards and start to zoom in a bit, the threatening effects gets less and the model is primarily stretched.
Perspective from above:
The effect is turned upside-down. The model seems to be smaller and slender. With a wide-angle lens (24 mm) it also gets biased/skewed (the head looks disproportionaly big). Not always the perfect perspective…
The rule of thirds
 Sometimes an central position of the model seems to be boring. That’s why big artists like Leonardo Da Vinci or the famous photographer Henri Cartier Bresson invented the golden cut as a design feature. You can remember the rule of thirds even easier as the golden cut – it’s not the same, but follows the idea of the golden cut.
It helps you to get good results fast, but there are also other ways that lead to the same result.
Let’s divide our picture into 9 parts, like in the image to your left. The most important thing, the focus of the picture so to say, should be positioned on one of the intersection points or lines in order to make everything appear harmonious.
If you remember this rule, even photos from your vacation or made with your cell phone will get better!

More tension in the photo because of the “rule of thirds”.

Looks more boring and less creative. You shouldn’t do that!
“Positive lines”
 The direction of lines in your picture is able to change the message of the photo completely. They exist due to edges, objects that are in-line, perspective of view, etc. Straight or horizontal lines seem calm, slow and permanent, whilst vertical lines look more dynamic and powerful. Diagonal lines can give a positive or negative statement to your photo. The positive ascending line (depending on your cultural aspects) normally comes from the bottom left to the top right, just because we normally read from left to right. But as already mentioned, this depends on the country or part of the world you come from.
If our line comes the opposite way, a negative interpretation can take place and gives a rather unsure feeling about the picture. These design features do not catch our eye – they’ve more of a subconscious effect, but they do work! That’s why you shouldn’t leave the direction of the lines in unremedied.
In chapter 5 we’ll teach you how to choose the right light setups and how to use them the correct way.
<– Chapter 3 taught you how to use different light shapers and tyes of light.
This post is also available in: German