 elixxier – Photo Blog Light settings and lighting structures for studio and outdoor photography. Tips and tricks for set.a.light 3D – The photo studio and light simulation for photographers.

This review was written by PhotographyPX. We are very pleased to receive an award for our software and to share this review with you, which gives a good overview of set.a.light 3D! Enjoy reading! :)
Introduction
Studio lighting is often one of the most challenging skills to master in photography. Unfortunately, some online retailers have over 1,300 softboxes listed, hundreds of monolights, and LEDs, all seemingly fitting the bill as an option to shoot in the studio. Yet, each of these products is different, and not all are created equal. So it’s no wonder why many photographers shy away from studio photography.
Of course, you could purchase and experiment with all of these modifiers and lights yourself. Or, you can tackle renting each of them separately. But, unless you’re a new crypto millionaire, it’s unlikely you have the budget for this kind of thing. That makes two of us.
Thankfully, there’s another way to experiment and practice studio lighting to develop your eye, even when you don’t have a subject around. And that’s where set.a.light 3D by Elixxier comes into play.
Available for both Windows and macOS, set.a.light is a 3D visualization software that aims to help photographers master studio lighting. And it’s here to simulate any lighting setup you can dream up, with a practical outlook on the final result too. Yet, you can master lighting all without having to move a muscle and lift a bulky 3-light kit meanwhile.
But, how does it live up to that promise? And is there real value in using a computer program to learn how to light? Let’s find out.

- Mit Klick auf das Video, wird eine Verbindung zu Youtube aufgebaut, es gelten damit die Datenschutzbestimmungen von Youtube. -
Background Experience
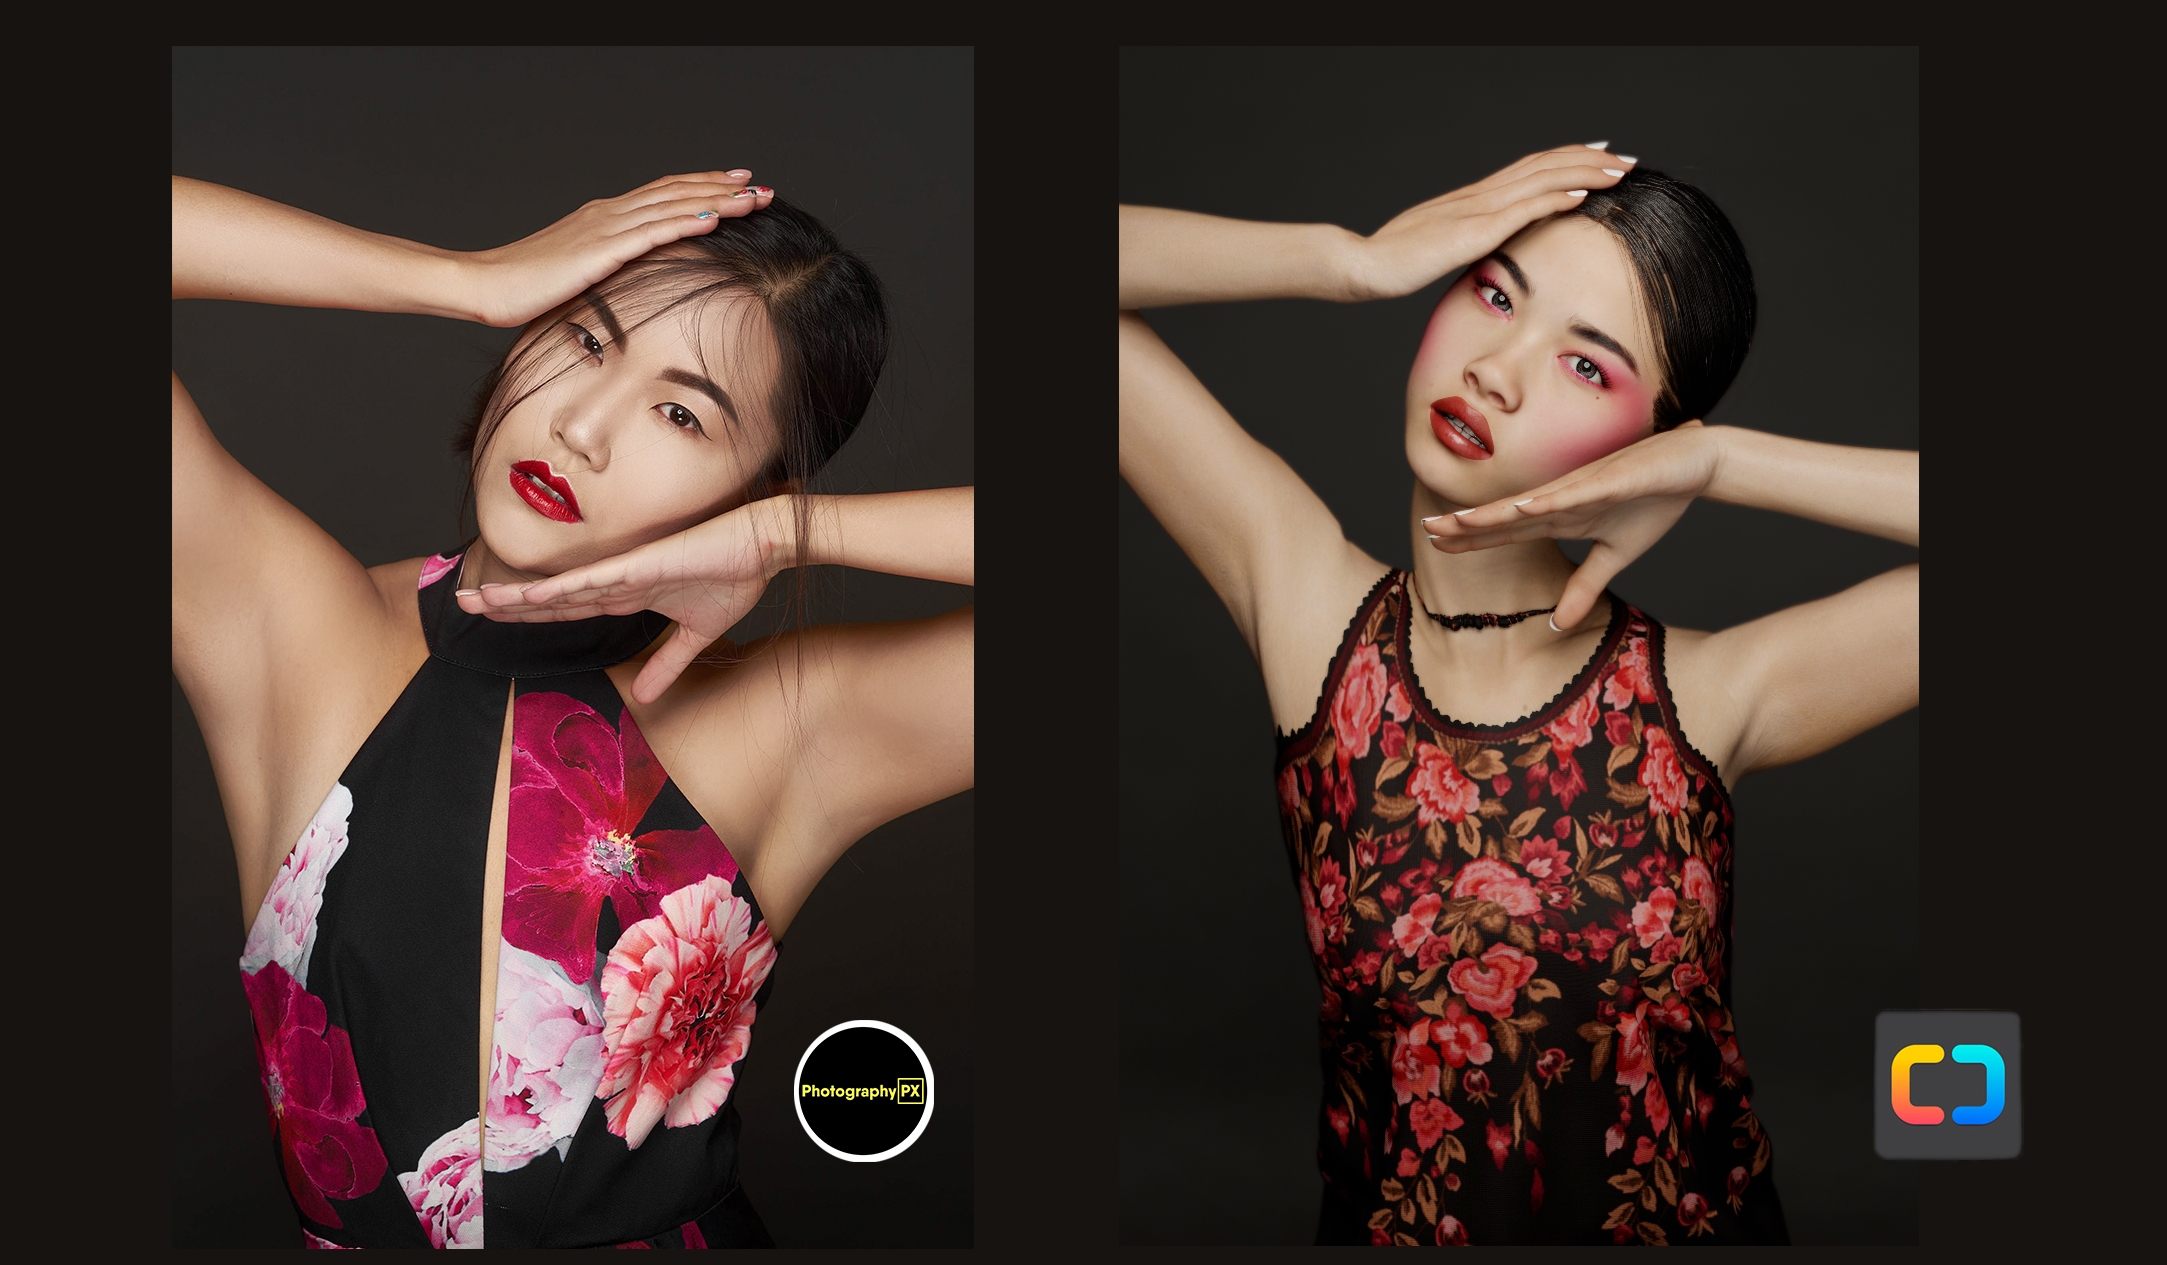
Below is a small gallery of recent work and the story of how I first discovered set.a.light 3D, if you’re curious or want to gauge my expertise.

It was late 2018, around the time V2.0 first debuted. That year was my second year shooting fashion and beauty photography. And I was still struggling to know what modifiers to get to shoot full-length images at home in my small, roughly 300 sq ft living room.
This was around the same time I ran into a YouTube video by Joe Edelman, an Olympus Visionary photographer, published showing a glamor lighting setup. During that video, he covers the specifics of the lighting setup using set.a.light 3D. And that was the first time I had seen the program live and in action.
But, for one reason or another, I didn’t think much about it at the time.
It wasn’t until I ran into Jeff Carpenter at WPPI the following spring and started watching his Instagram stories did I see the tool again. But, now I was ready and more frustrated than before. So I immediately downloaded the trial, experimented with a few setups, and gradually watched all of the tutorial videos.
That year, set.a.light 3D helped me understand how to set up lights in smaller spaces and master what apartment layouts work best for shooting at home. I was able to slowly but painstakingly test all of the modifiers and light setups I thought would work to figure out which ones did work. And that process removed much of the trial and error with purchasing unnecessary equipment that ultimately wouldn’t deliver the image I was after.
Today, I’ve been using the tool for three years and have quite a deep understanding of how it works. I’ve also witnessed firsthand the unwavering commitment Elixxier has made in refining it since V2. And, it’s been quite impressive to see that transformation.
But, with that said, let’s move into the review itself and start from the very beginning.
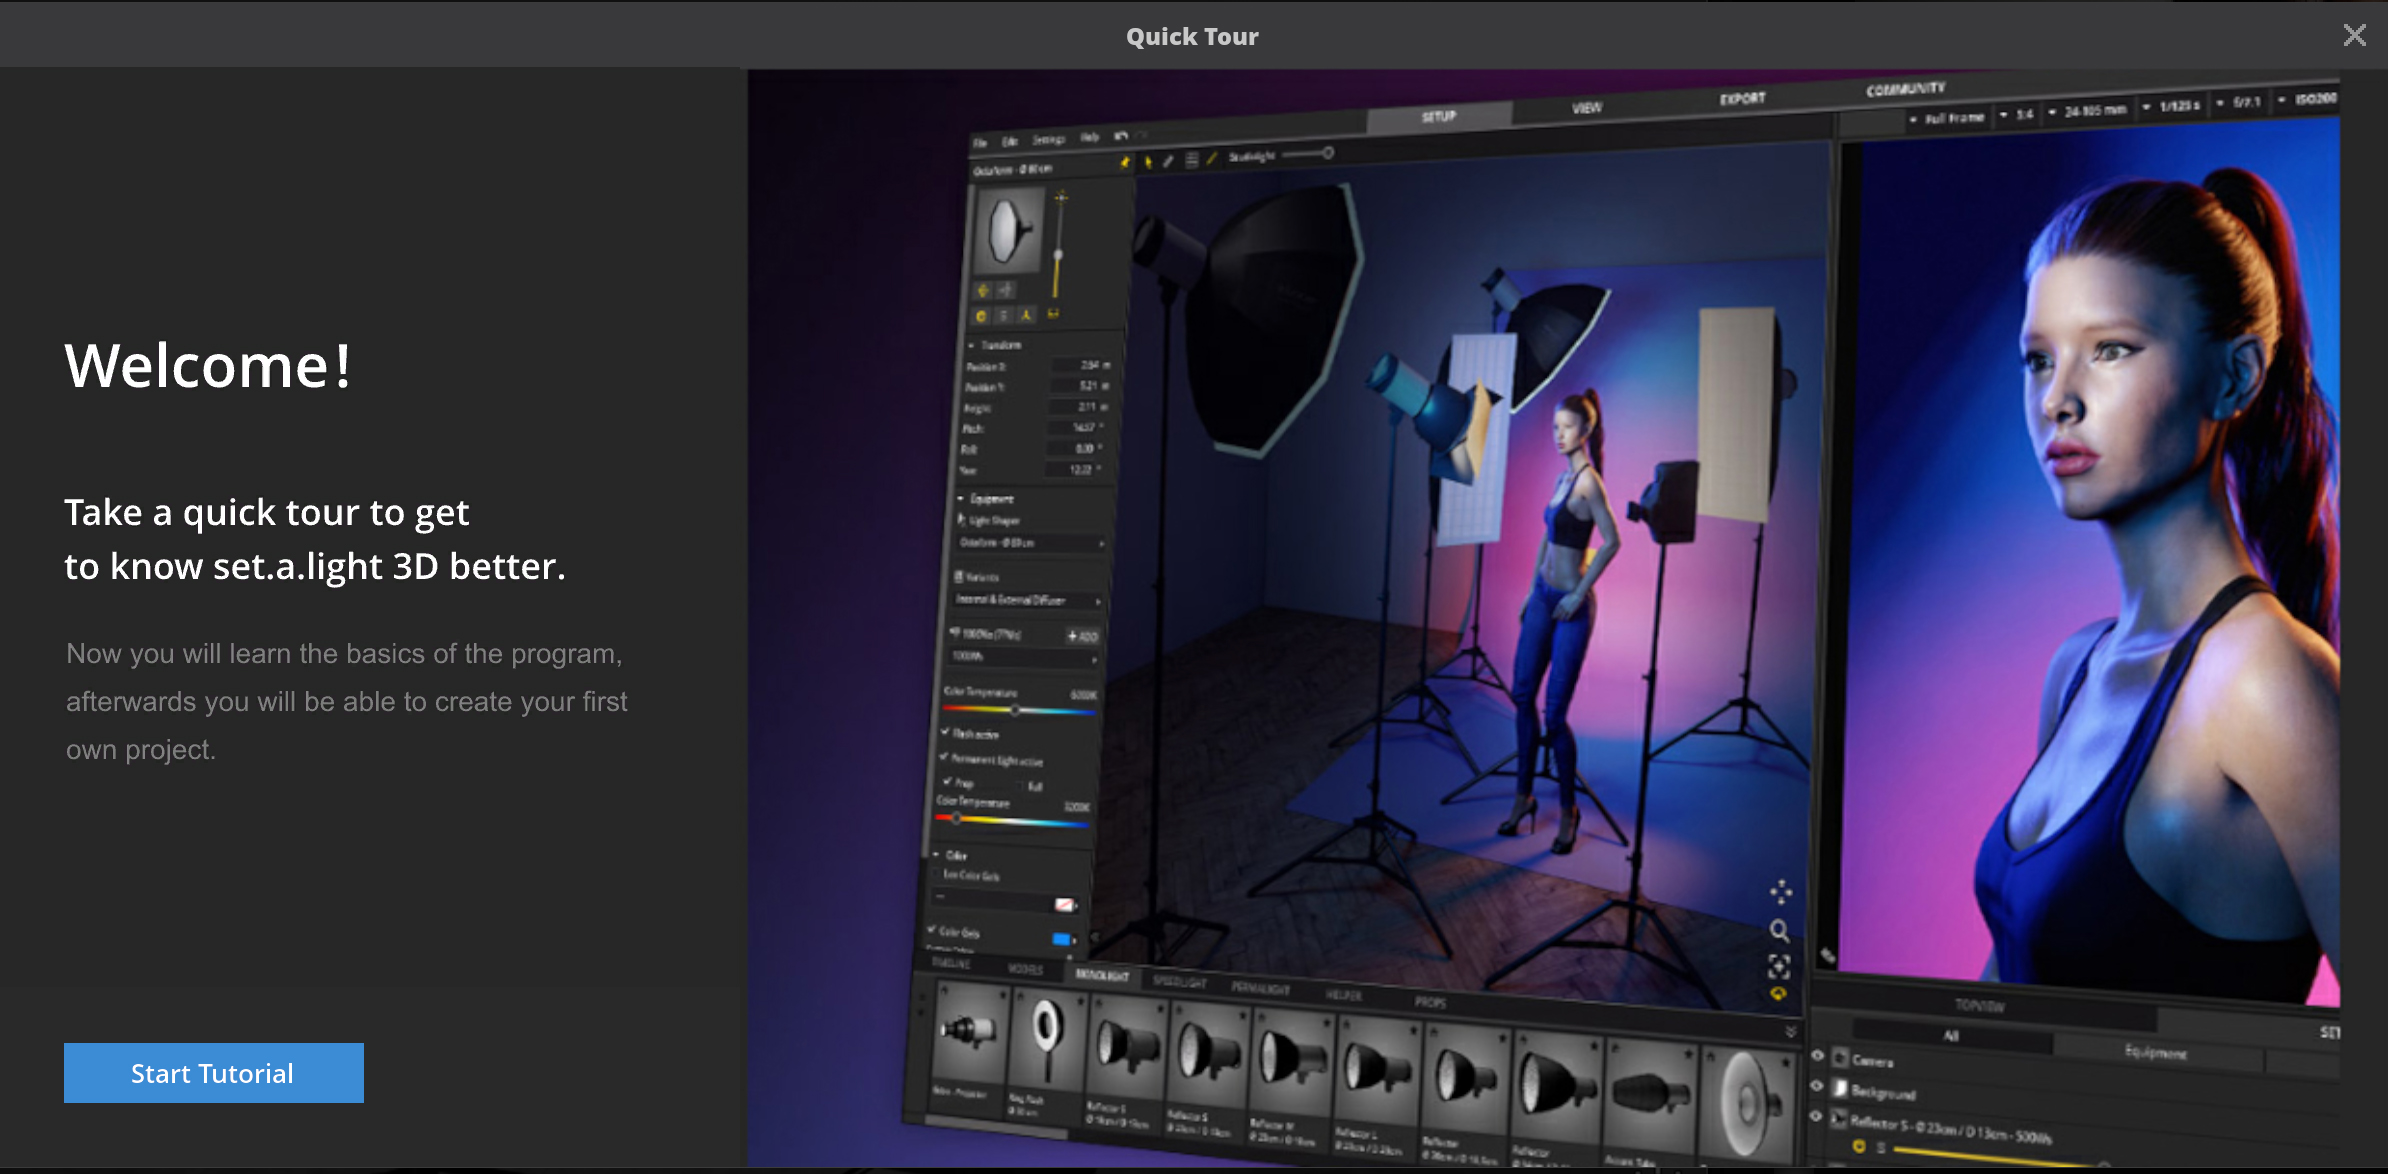
Initial Setup
Upon startup, you’re prompted to open a previous project, a template, or create a new project with a default studio size from a small to a large room.
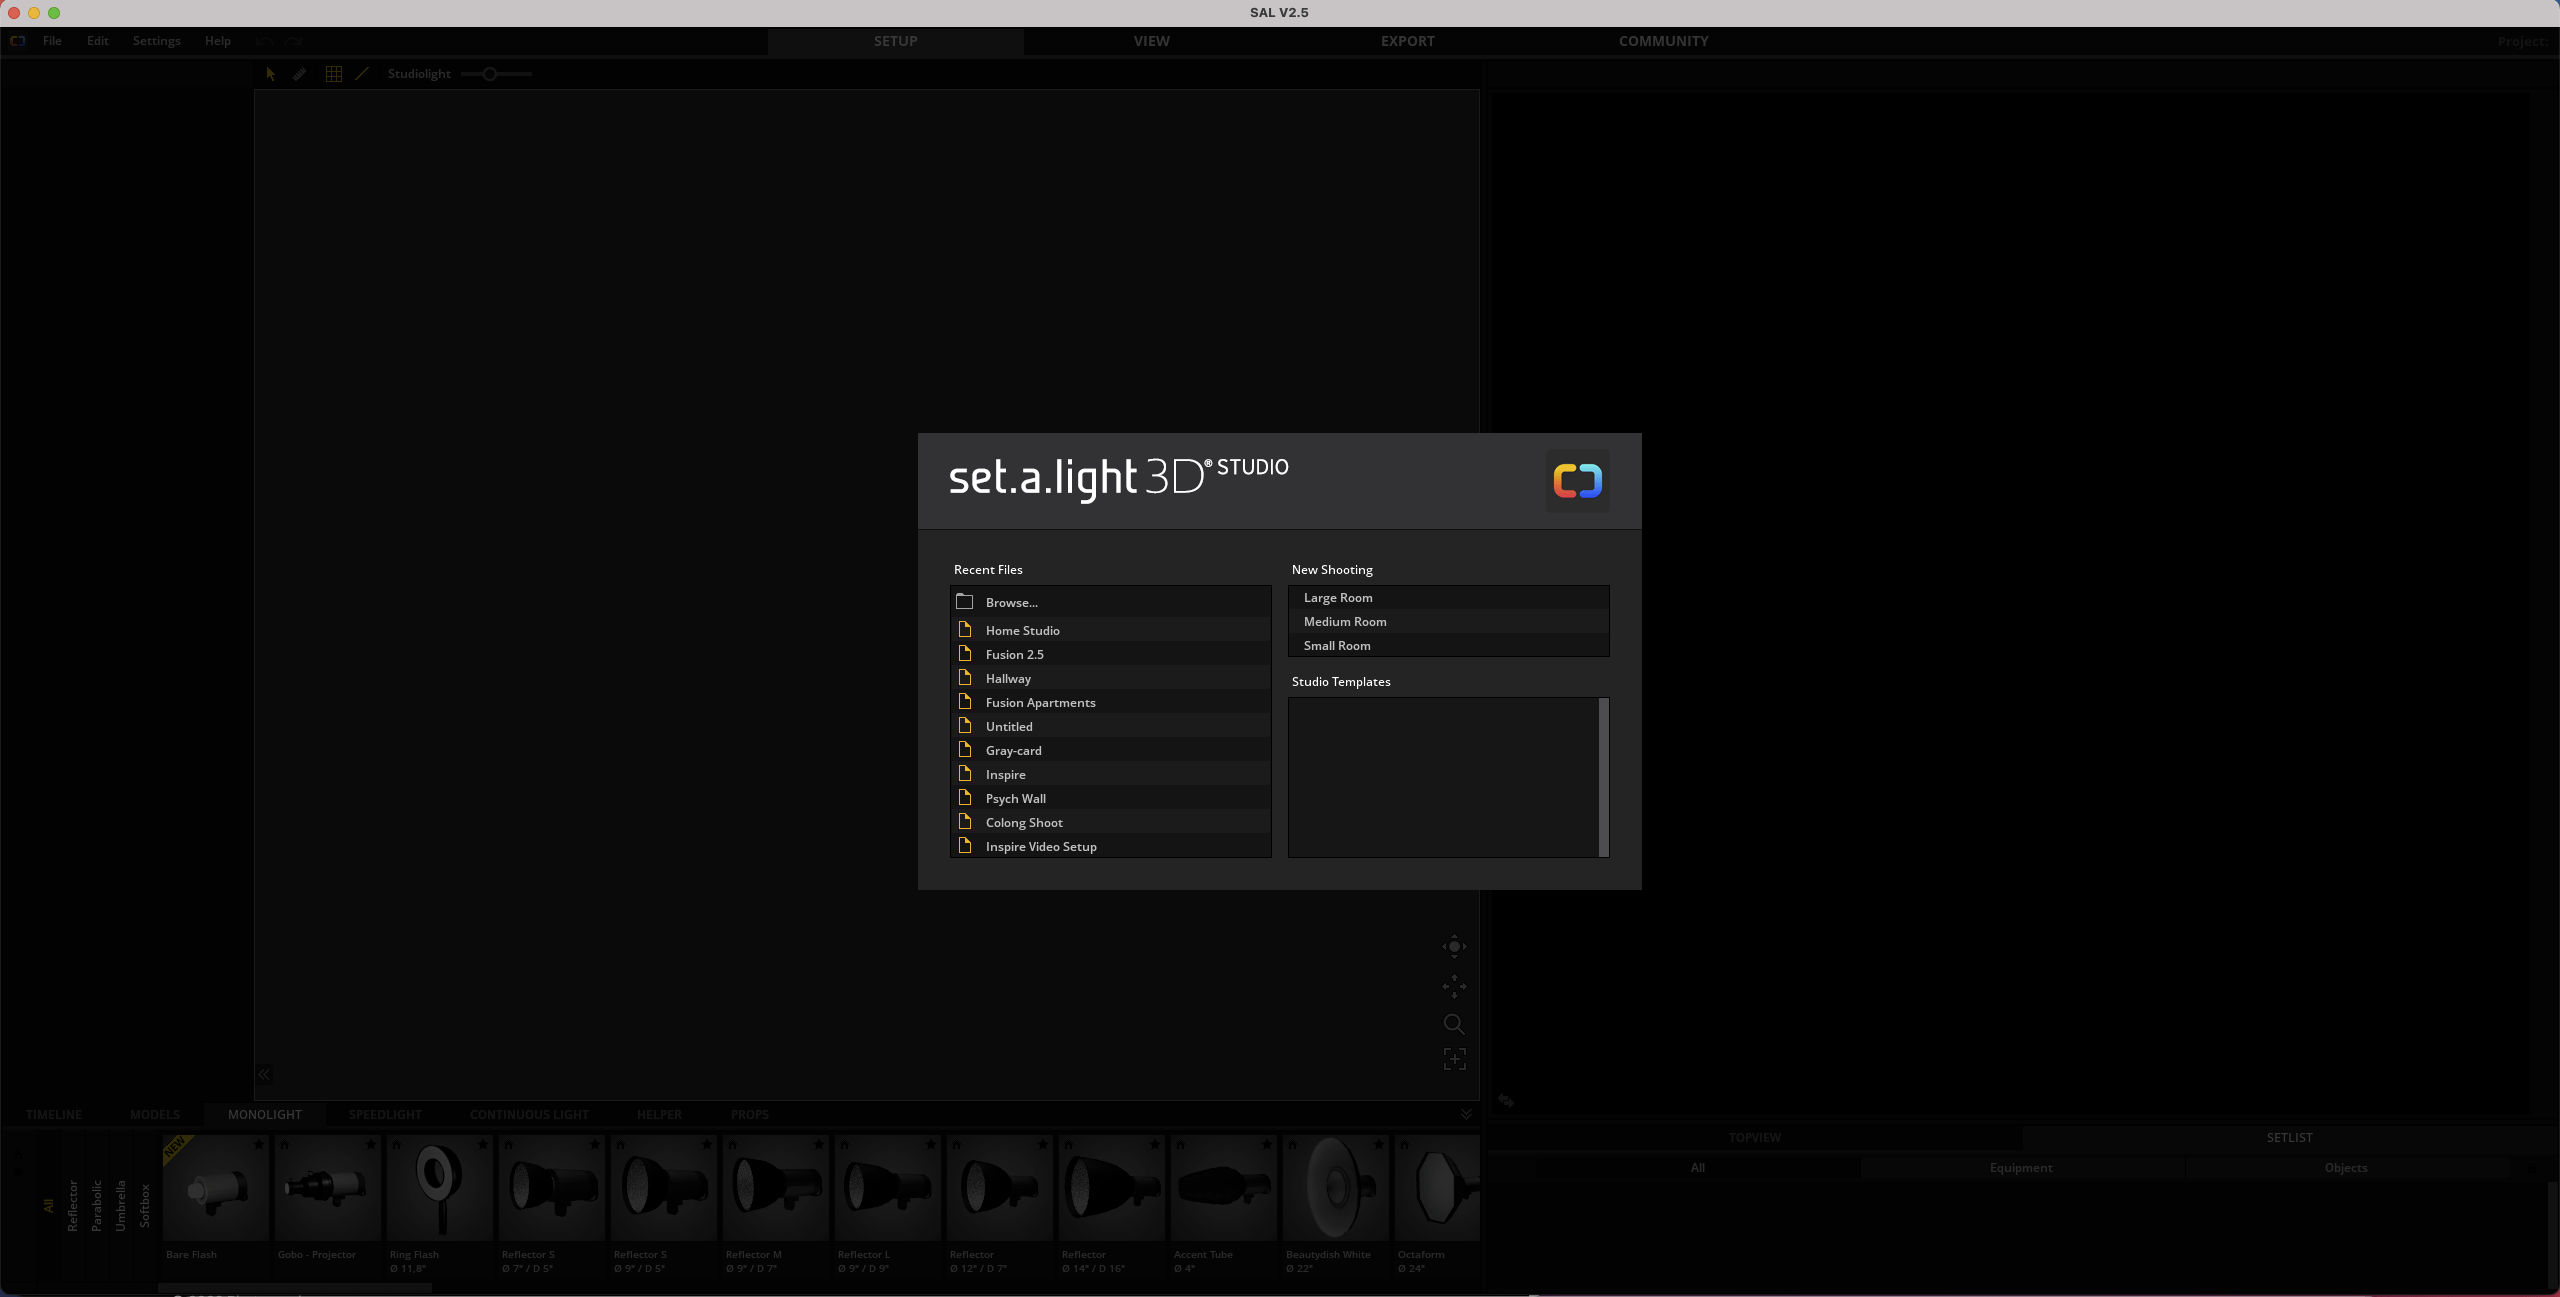
With version 2.5.8a, creating a new project with a default studio size opens a blank canvas with a two-light setup and a female model framed in a headshot. And selecting a preset room (small, medium, or large) merely changes the dimensions of that room from 320 sq ft, 480 sq ft, or 832 sq ft. But, the lighting setup, camera settings, and framing remain identical.
For many photographers, the small or medium-sized rooms are ideal starting points, as they’ll represent the average studio more accurately. But, using the large room does provide immense freedom, and it’s a great means to create your “dream studio.” Either way, once we select the appropriate room, we’ll immediately be greeted with the main user interface.
General User Interface
Here we are with the main user interface with set.a.light’s four main windows. I’ll cover each starting from left to right.
The first window, called the Detail Settings, is where you’ll fine-tune the orientation and size of the objects you’ll drop onto the Studio Area. These objects include models, lights, modifiers, and props. This window is also where you’ll configure the room itself, like changing the dimensions, color, floor type, and more.
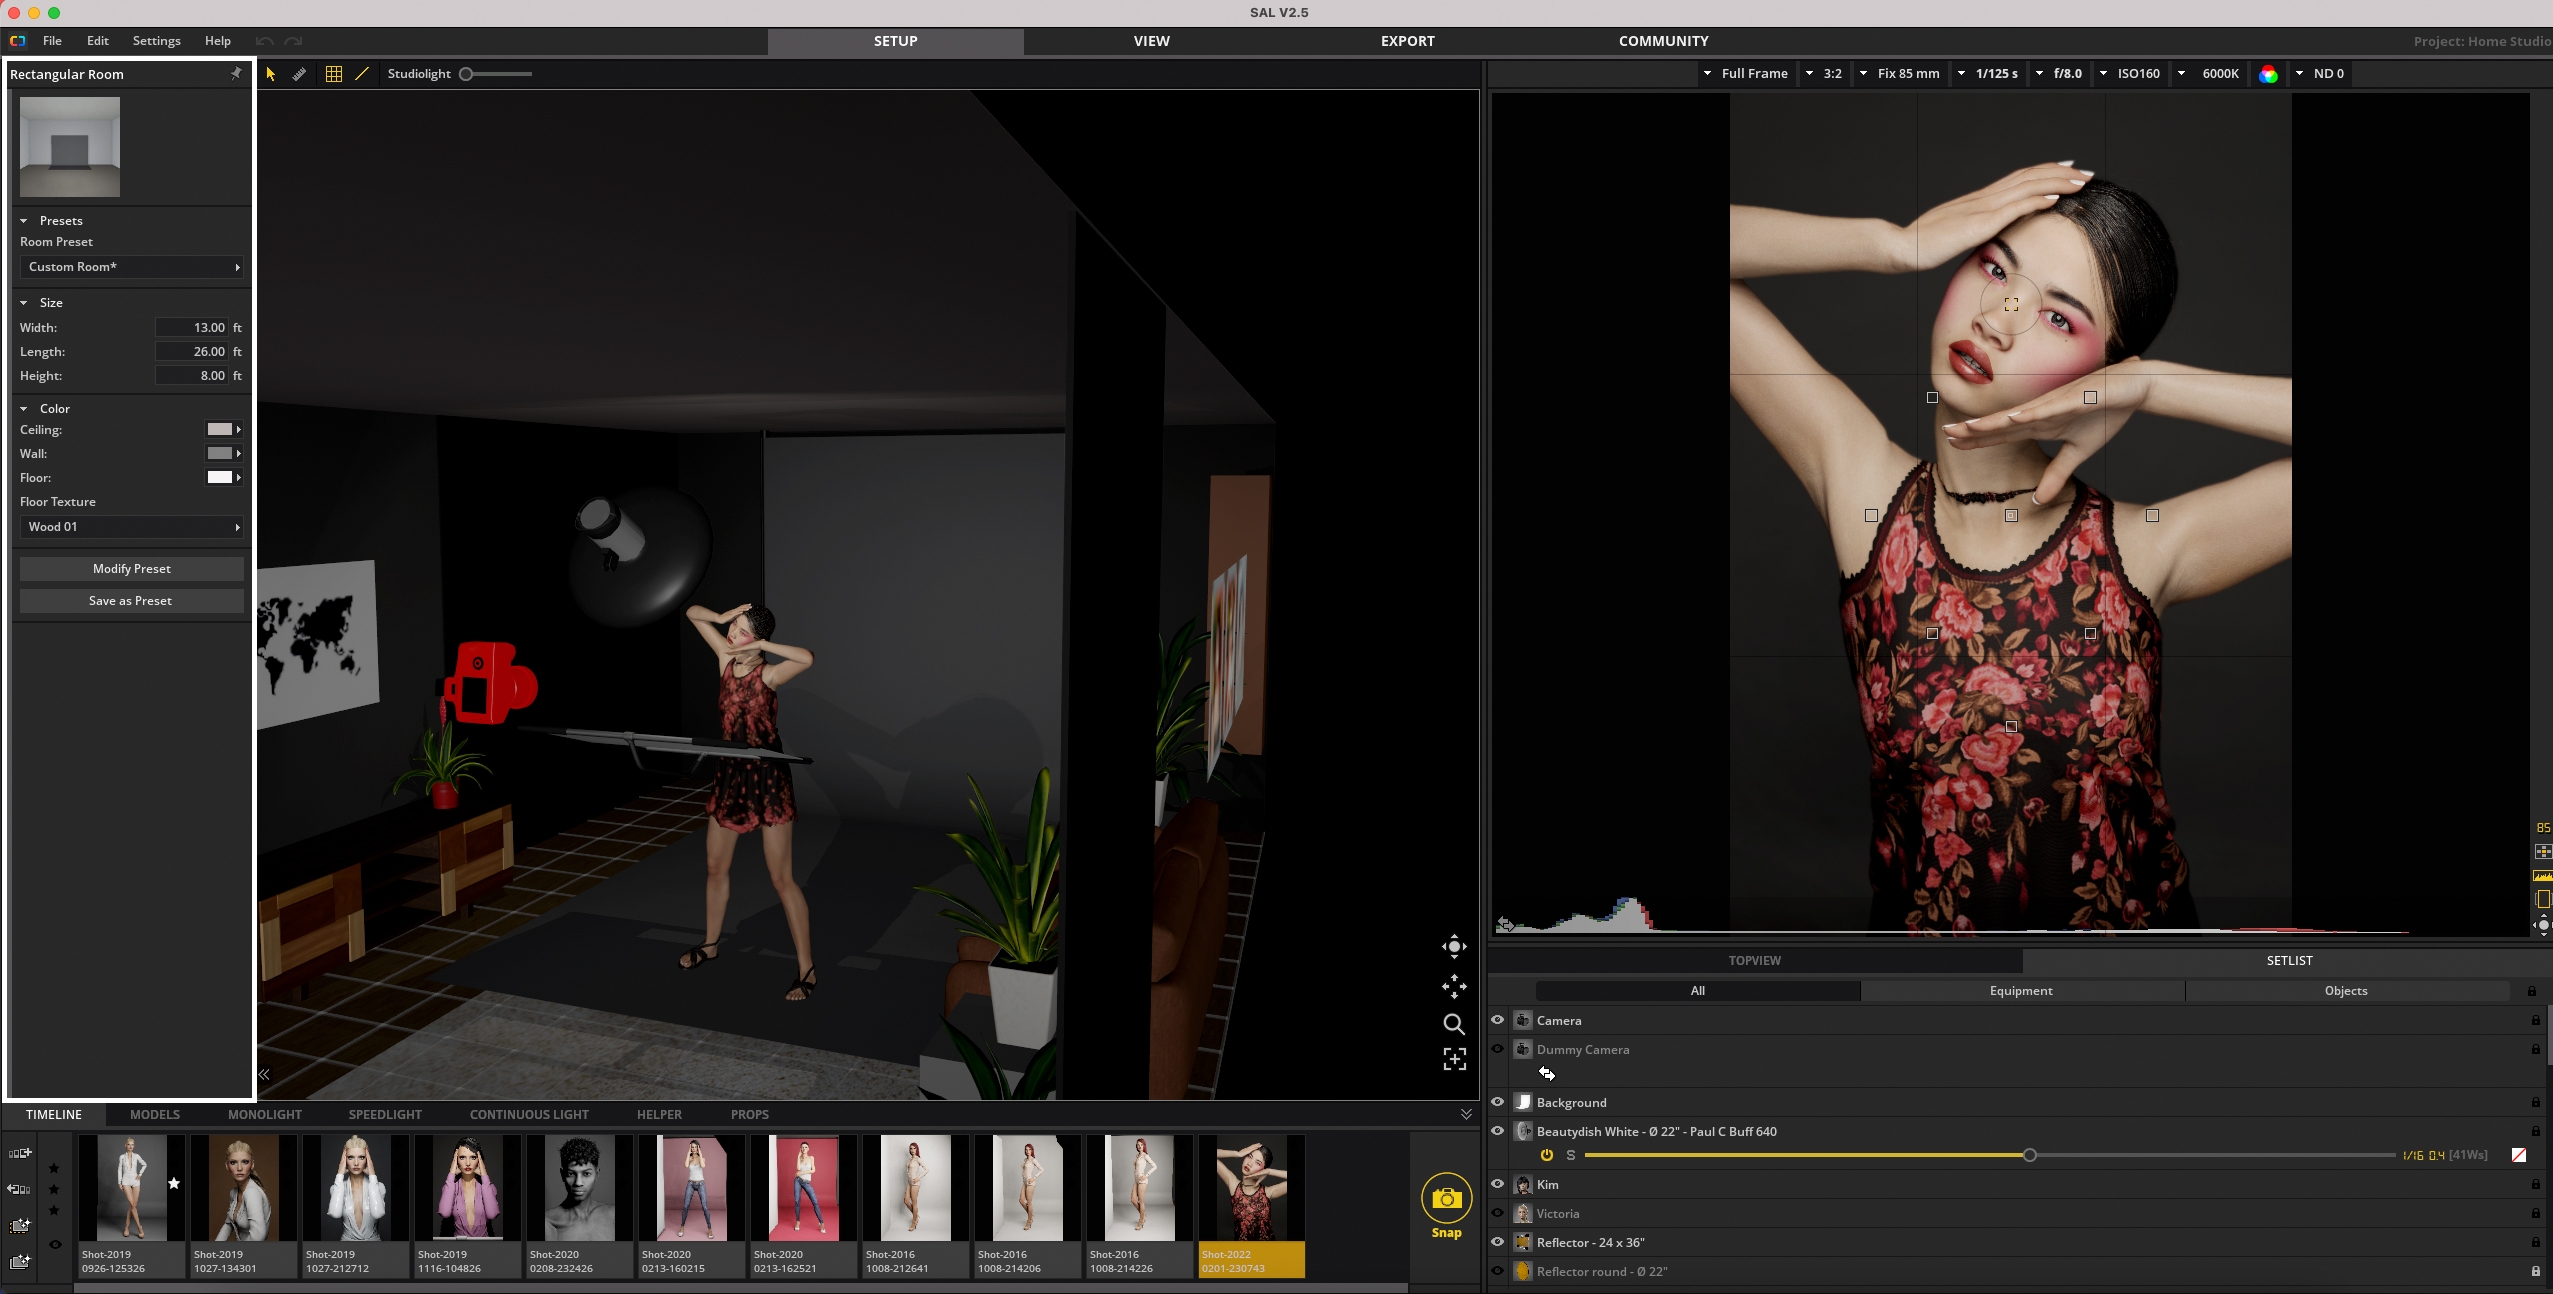
The second window, called the Studio Area, shows the studio space itself and all the objects within. Here, you can navigate and view the studio space in real-time to better understand the setup as a whole.
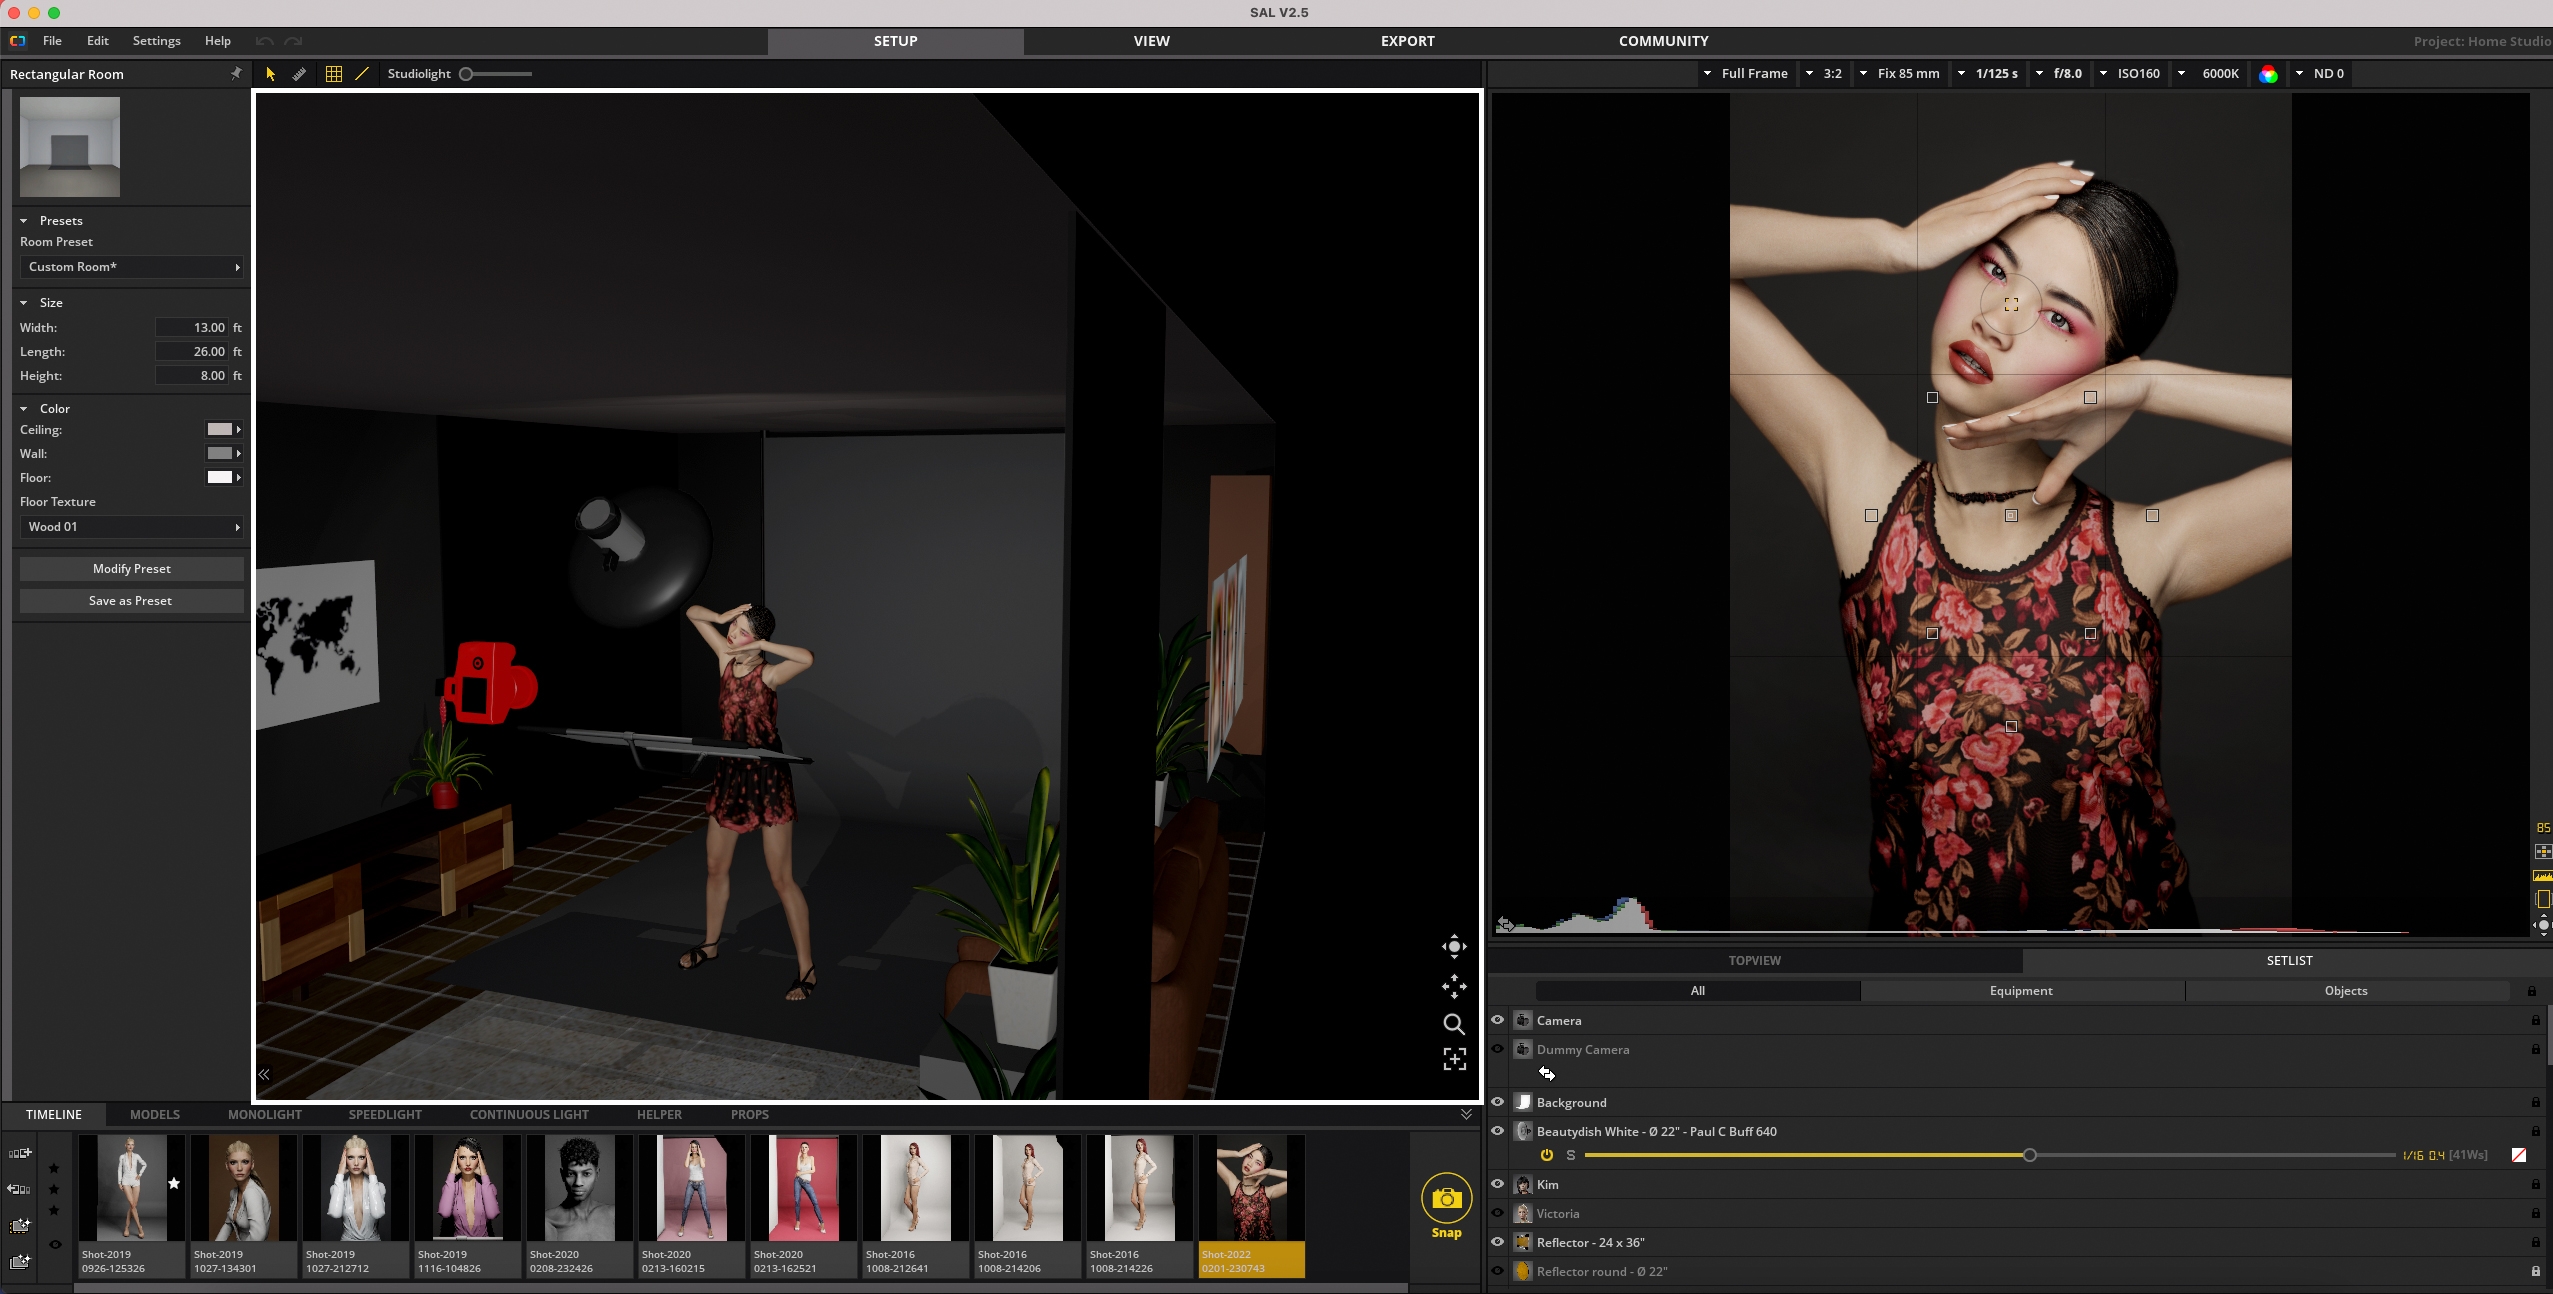
The third window, called the Studio Library, is where you’ll find all of the various objects the software offers. These include models, lights, modifiers, and a slew of props. Here is also where you’ll access the Timeline, which stores snapshots of your setups. And these snapshots are perfect for quickly recalling various setups saved in a single project file. It’s also an excellent way to test slight changes between setups and compare them directly.

The last window, called the Studio Overview, shows a real-time histogram, the preview camera, the studio top view, and the setlist. Here, you have full control over the camera’s exposure, focus point, focal length, orientation, and the final image render. Using the setlist lets you review and rename any materials or equipment in the studio space. In contrast, the top view is an excellent means to organize your studio space as a whole and have a quick top-down view of the setup.

Initially, the user interface may look somewhat overwhelming and complex, as there’s a lot of information on-screen. But, with some experimentation or watching the detailed videos Elixxier has on each of the windows, it’ll become quite intuitive. And you’ll realize the interface only has the necessary information. Nothing is there without reason.
Overall, we’d say the interface is intuitive, thoughtful, and well-designed, considering the complexity of this software.
Studio Space
With the interface covered, let’s move to the more specific windows, functions, and the practical workflow of set.a.light 3D.
The first step of the workflow is to configure our studio space. And we’ll start by adjusting the dimensions of the room, wall colors, and flooring using the Detail Settings window.
I encourage you to recreate your studio as accurately as possible here, every detail from the dimensions of the space, the type of flooring, and the colors within it. So that means measuring your physical space with a tape measure and matching the colors and flooring as closely as you can in set.a.light 3D. Below is an example of our YouTube set up in my home studio.
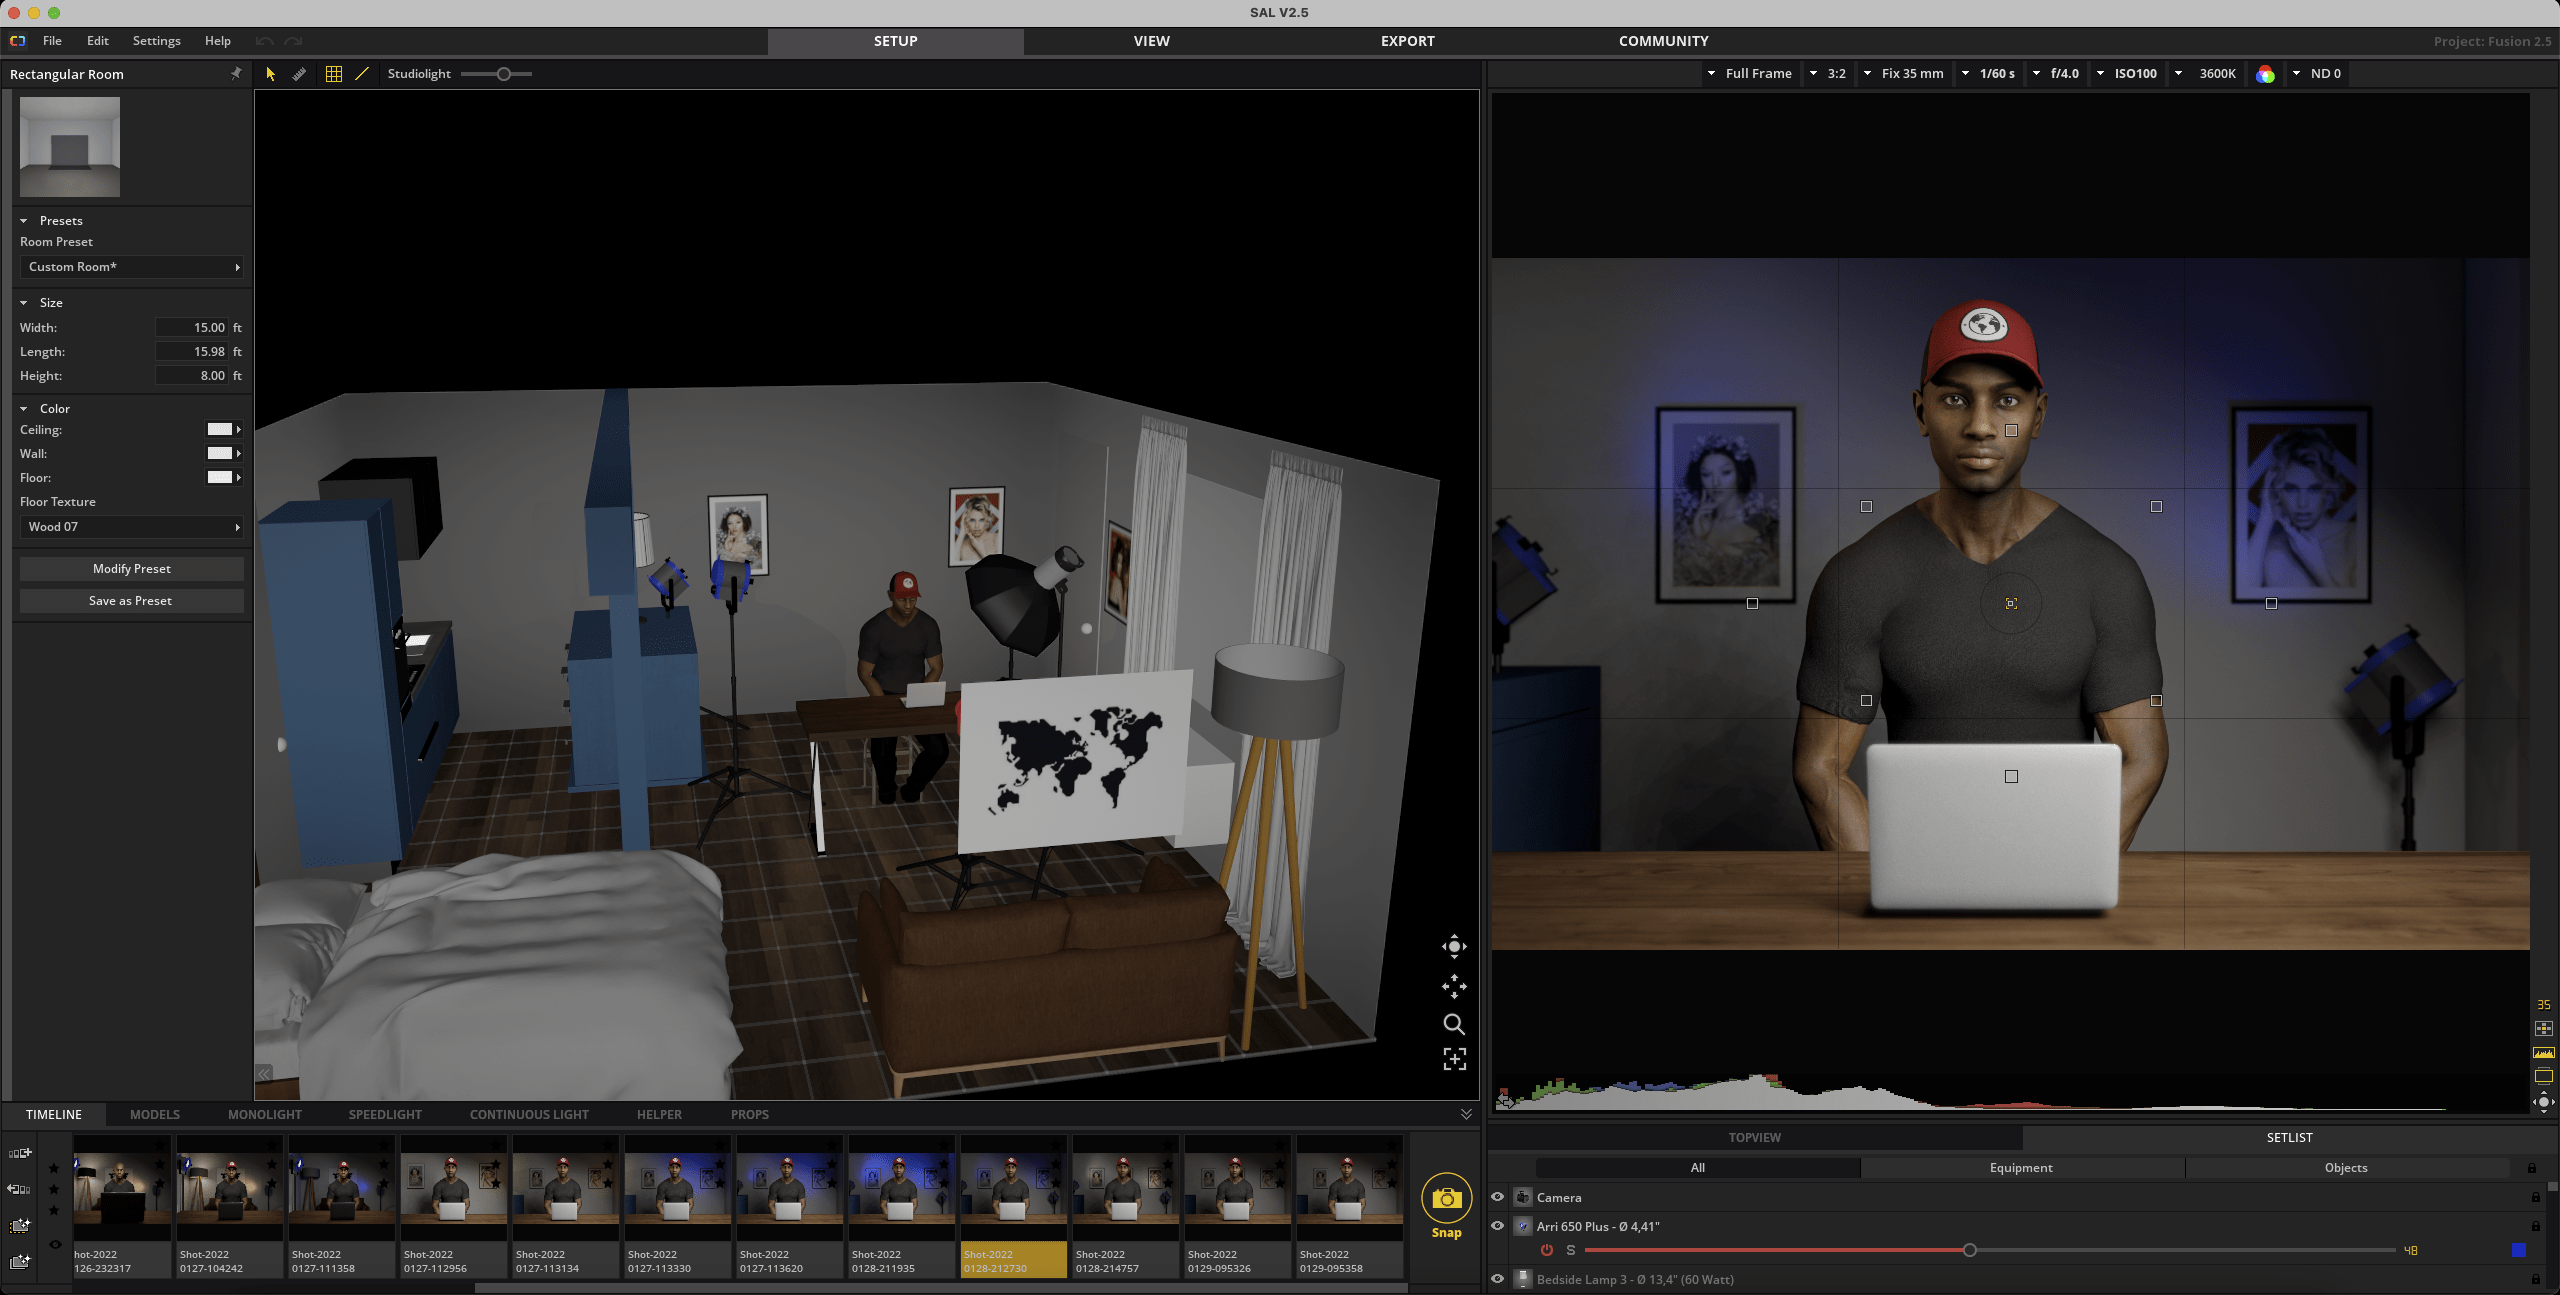
While a bit tedious, this process is crucial as it gives you the most realistic idea of your real-life studio space. It also helps determine if any color cast from your walls or flooring will affect the photo, as colored walls indeed change your white balance. Thankfully, the program does render these changes, and it does so well.
Overall, Elixxier offering the option to create custom studio spaces is a huge win for this program. And it’s also enormously helpful to photographers, especially those shooting in a home studio setting where wall color and ceiling height genuinely matter. So I’d like to stress again that recreating your space is a must if you’re looking for the most accurate pre-visualization. And in this regard, this program will help tremendously.
Cameras & Lenses
Now the real fun can begin.
The first stage of the workflow is setting up your camera and lens combination. You have two options to do this. You can either select the camera in the Studio Area or use the Studio Overview window. Below are images showing the difference between these two menus with the Studio Area on the left and the Overview on the right.
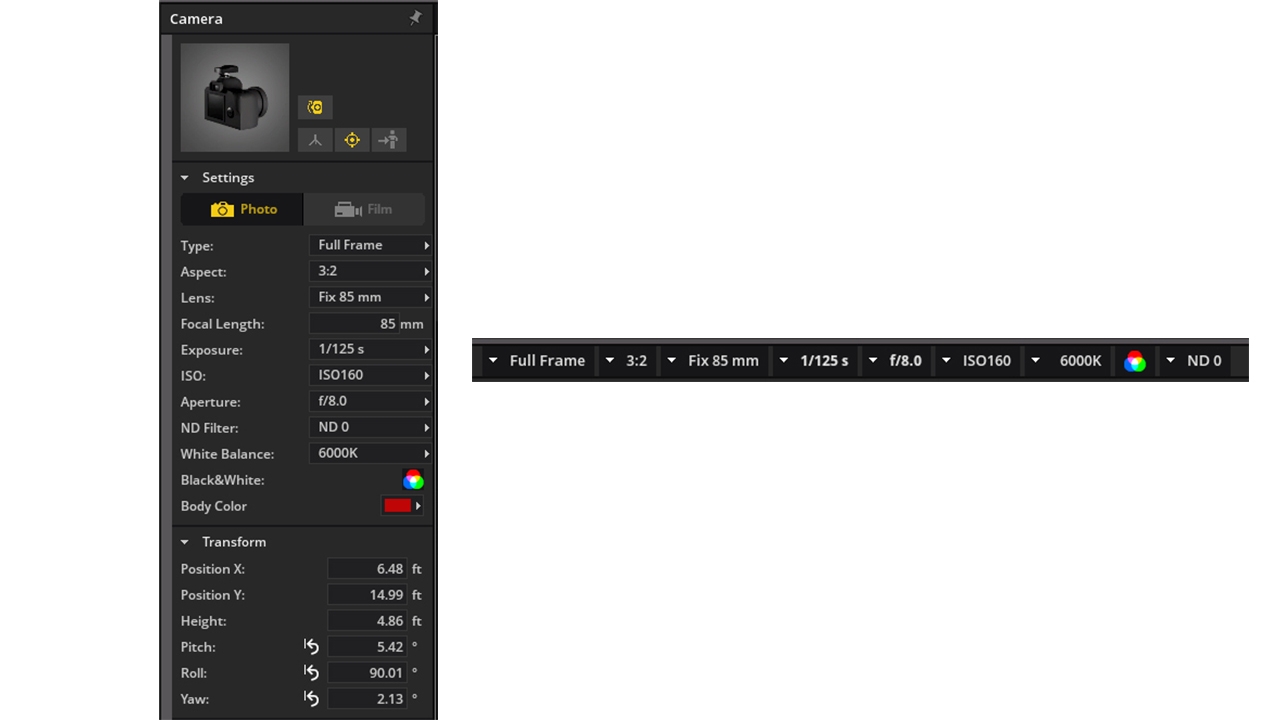
I find that selecting the camera in the Studio Area is the most intuitive. This way also lets you change the Transform settings, which includes its location in the studio space, height, pitch, yaw, and roll. And those settings are invaluable for placing the camera in the correct position for framing. But, either way, both methods offer the necessary settings, like exposure, saturation, sensor size, and focal length.
With that said, the first real decision we make is whether we want a traditional stills/photography-oriented camera or a video camera for film.
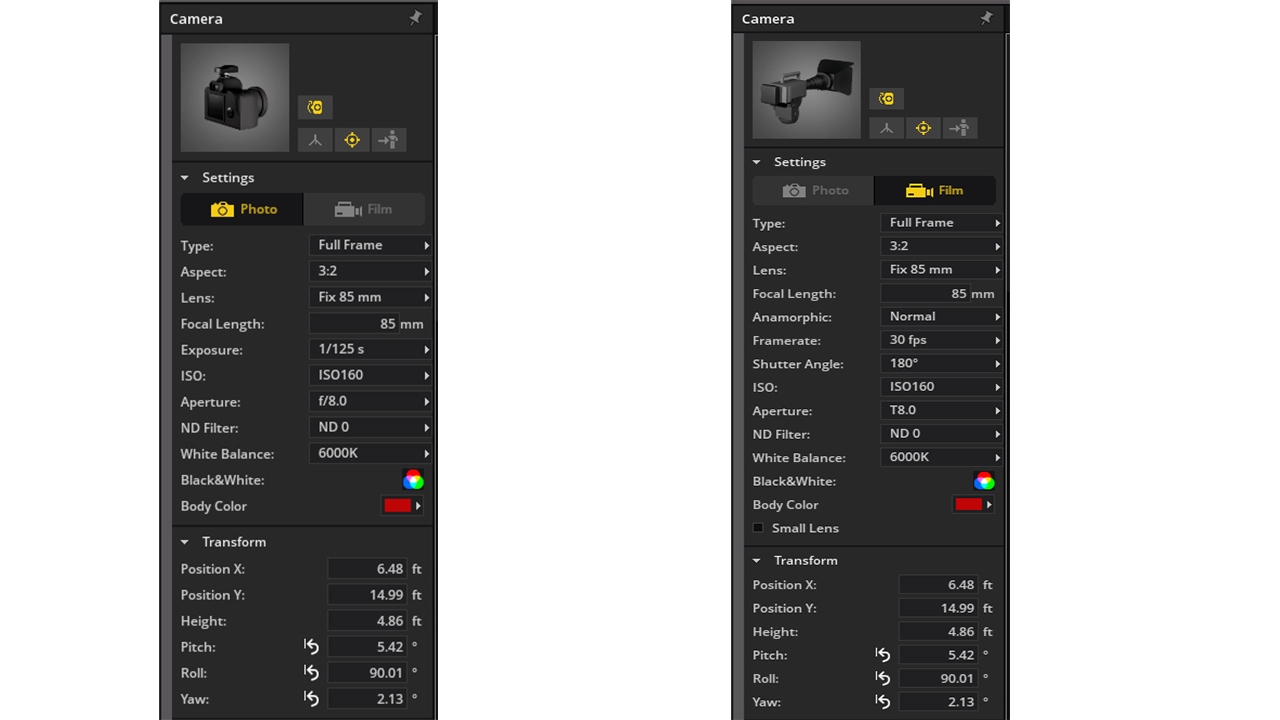
Elixxier added the video camera as part of the V2.5.5 update to help gear the software towards filmmakers, an excellent addition, I might add. However, selecting the video camera does change the Detail Settings tabs to read videography terms, such as shutter angle, frame rate, and T-Stop. So keep that in mind if you’re unfamiliar with these terms.
From here, though, you’ll want to select your camera’s sensor size, which ranges from full-frame to 8×10″, and your aspect ratio if working outside of the standard 3:2 frame. Below are images showing the full range of sensor sizes and aspect ratios available with V2.5.8a.

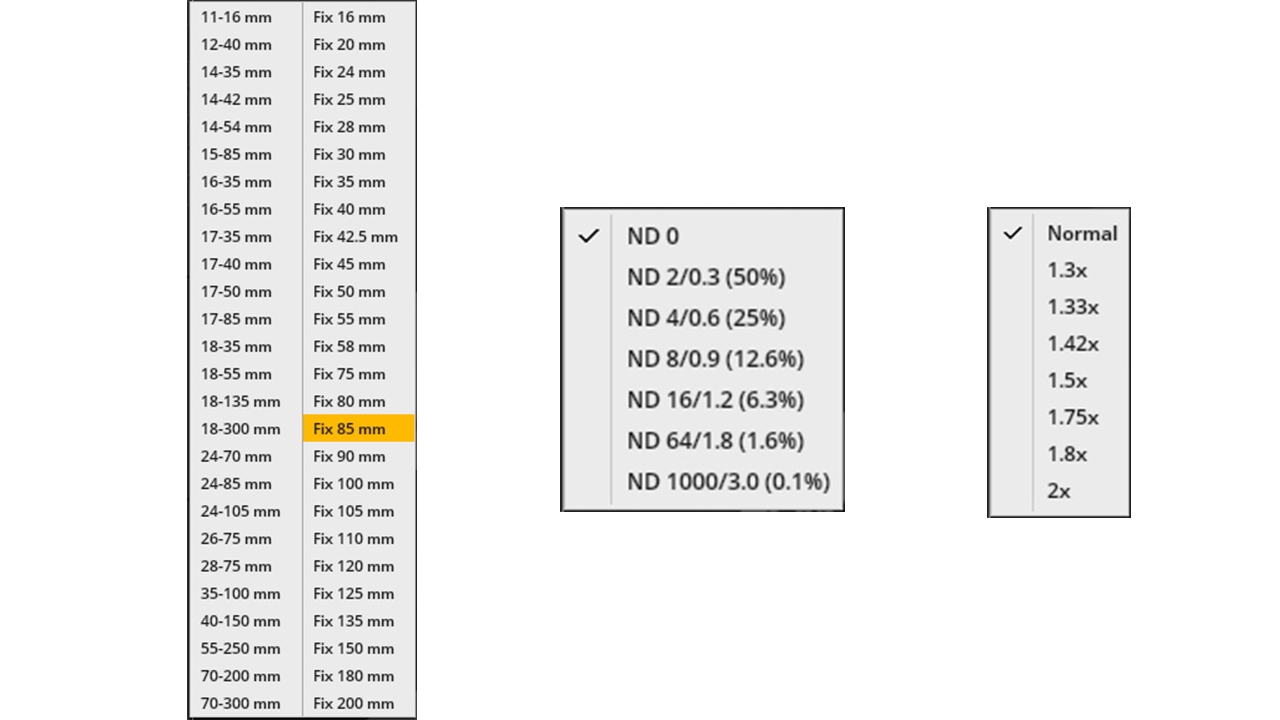
Next, you’ll want to pick the lens and focal length if you choose to use a zoom lens. In total, you have 52 different lenses to choose from, half of which are primes, the others zooms. You can also enable a Neutral Density (ND) filter of various strengths and an Anamorphic lens with common ratios. Below are images showing all of these options.
The remaining settings will come down to your depth of field requirement and white balance, and saturation preferences. Every shoot is different, so these are all highly dependent on the images you’re after.
Either way, the above steps are the basic workflow on how you’ll set up the camera. And it’s quite a surefire way to do so.
Overall, the camera and lens options available in set.a.light 3D is quite comprehensive. Elixxier has gone to great depths since V2.0 to add many new lenses, sensor sizes, aspect ratios, ISO settings, FPS values, the ND filter, and anamorphic options. There are a few minor niche things still missing, which we’ll cover in the limitations section. But, as is, it’s doubtful most users would find the current setup restricting. The opposite.
Models and Clothing
Once you’ve configured the camera with some basic settings, it’s time to get the models onto the set. From there, we can design our lighting and refine our set design using props.
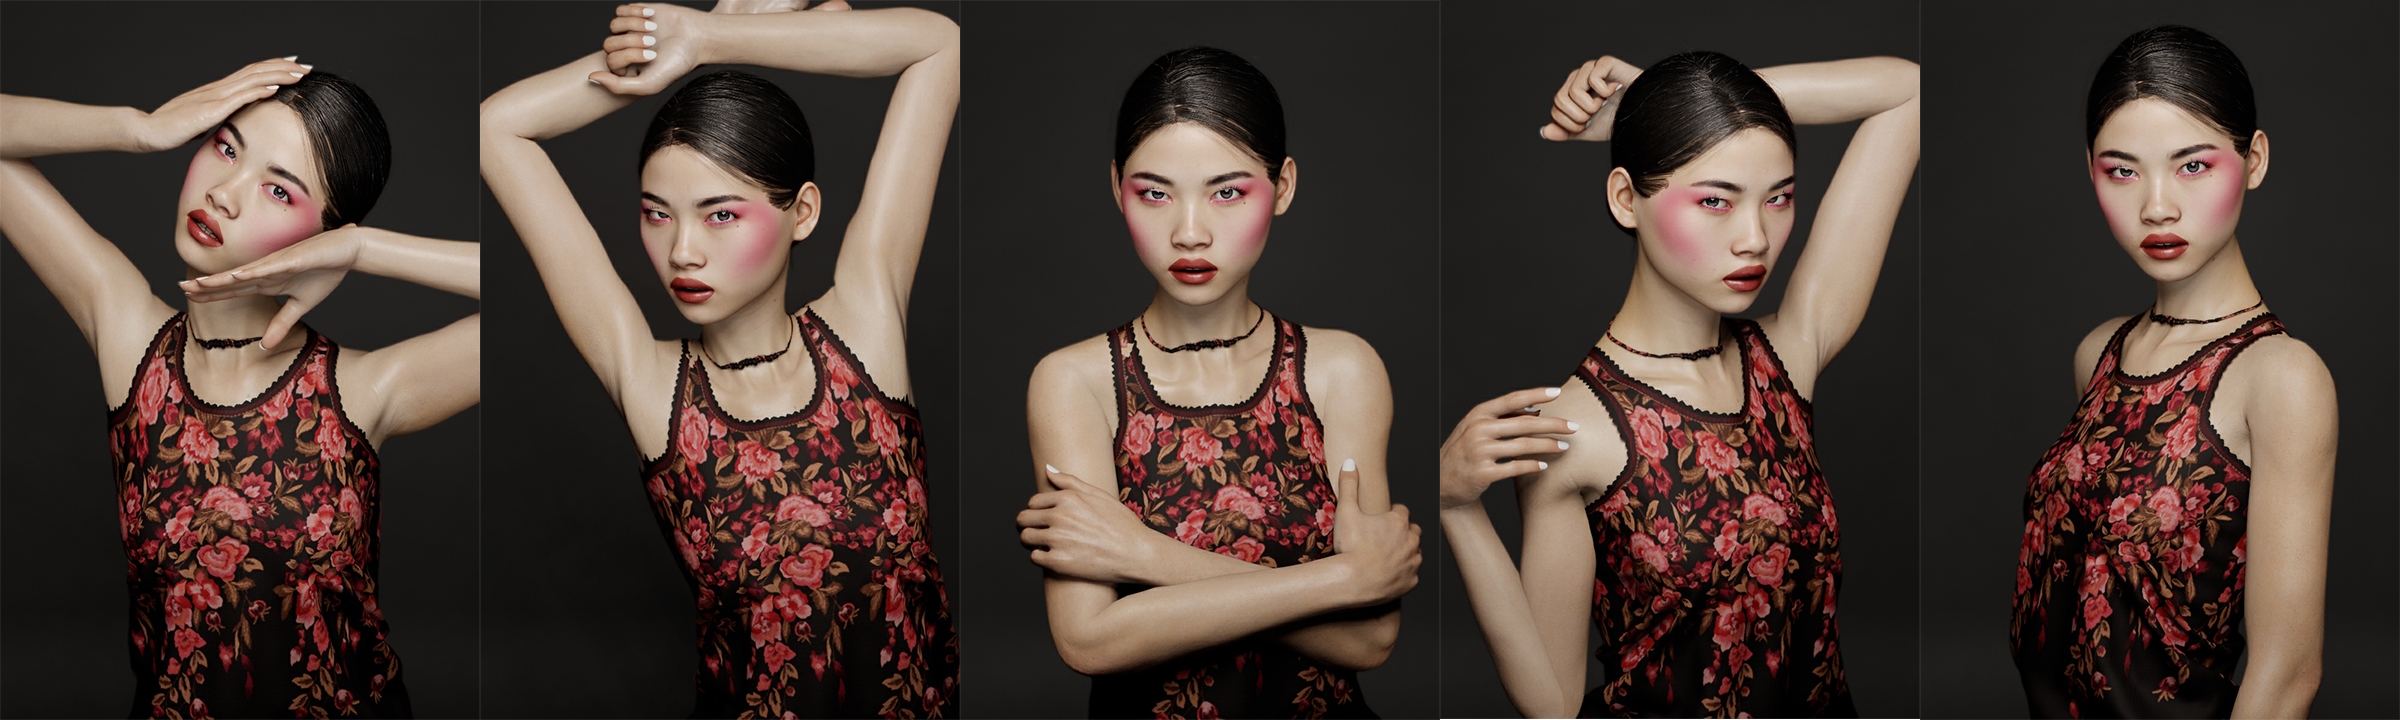
set.a.light 3D, as of V2.5.8a, comes with ten base models, six adult women, one female child, and three adult men.

8/10 of the models can model nude, while everyone has several clothing styles, accessories, and hairstyles. Each model has a unique style, so clothing, hairstyles, and accessories options do vary slightly.
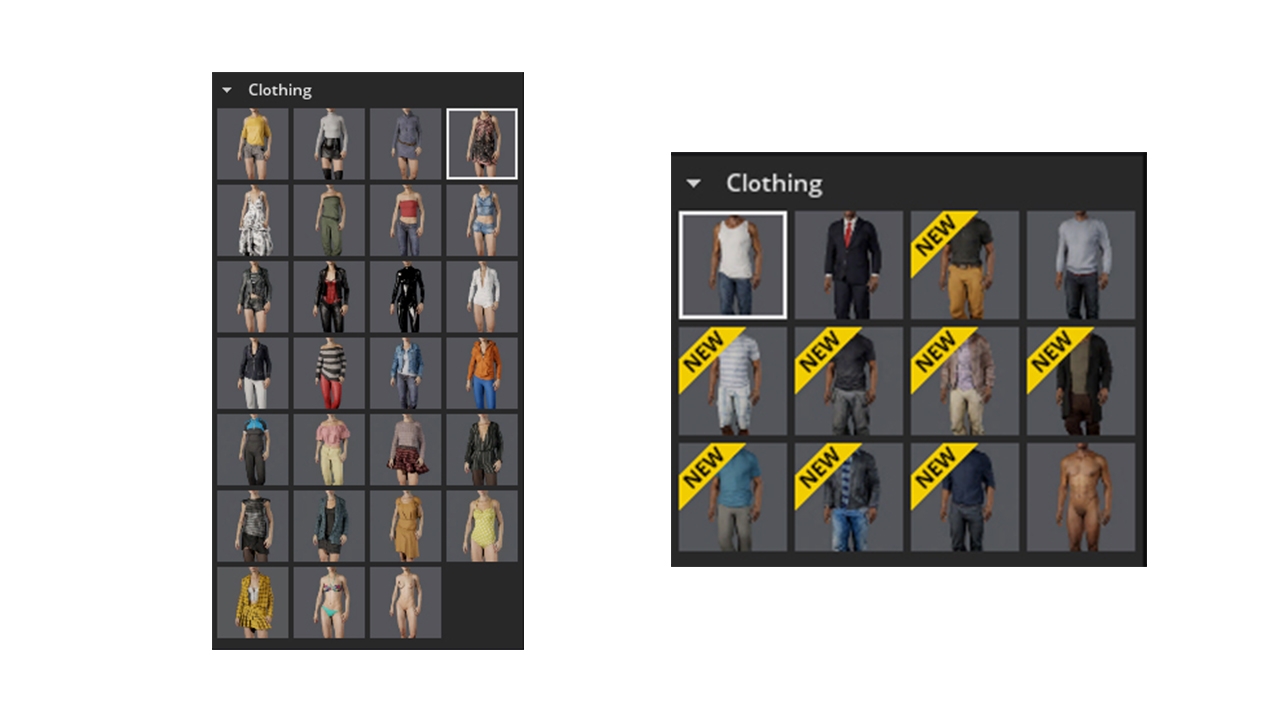
Even so, there’s a healthy selection of ages, skin complexions, and nationalities here. There’s also a welcomed selection of makeup options, including lip and eye colors, as well as skin dewiness. In total, we’re talking approximately 38 hairstyles, 42 outfits, 5 beards, custom eye, skin, and hair colors, and 8 makeup looks.
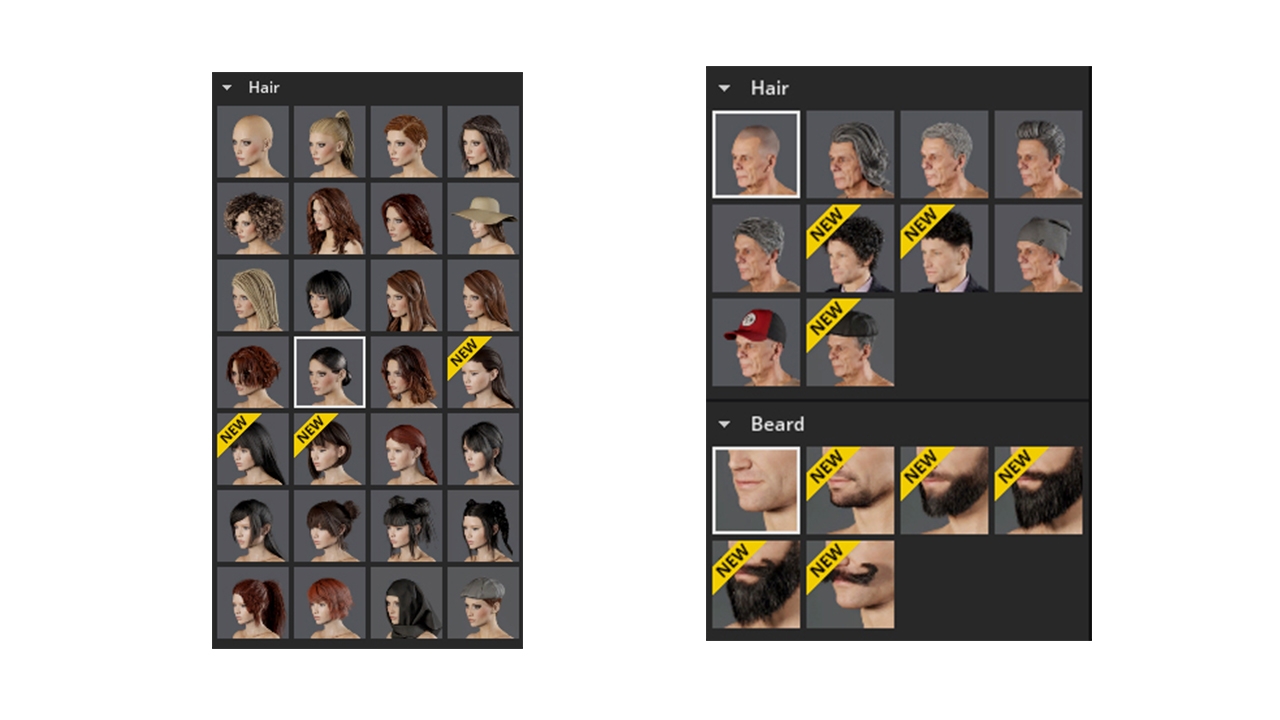

Overall, in this regard, Elixxier has made enormous improvements. Since V2.5, they’ve added two new models, a slew of new outfits, makeup options, and many new accessories, like hats. And with V2.5.8a, there’s a lot of control now to specify how the model looks, so you can really get detailed, which is great for mood or storyboards.
Posing
Once you have your desired model, it’s time to pose them. And this is where the real fun and also challenge begins.
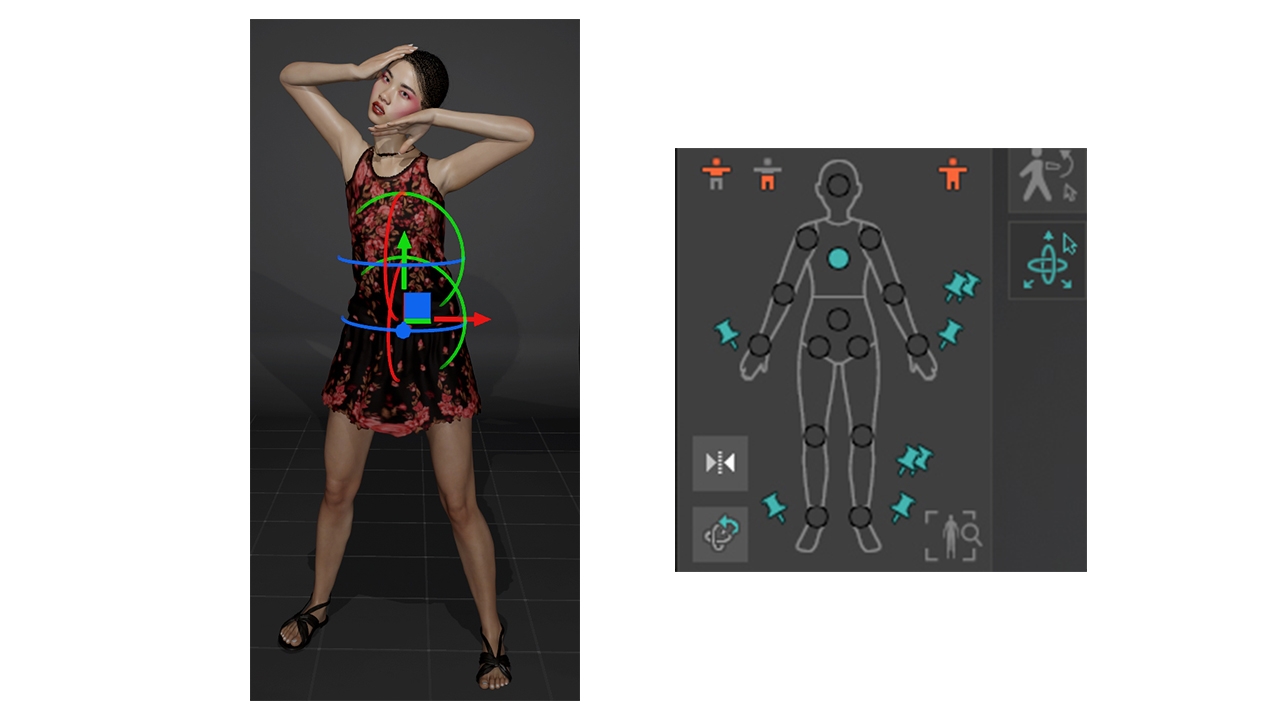
You have two options to create a custom pose. You can either use the Basic Panel combined with shortcut keys (CTRL or SHIFT) or the Advanced Panel, which gives you complete control over each joint’s x,y, and z-axis.
Both methods let you move the model with a rag-doll-like effect. But, you have incredibly precise control over with the Advanced Panel.
You can even adjust the model’s proportions, like chest, waist, arm, or leg size/thickness. So you can create an ultra petite 6′ runway model for high-end fashion or glamor or a 5’2″ model for casual lifestyle photos. The possibilities in this regard are endless.
With V2.5.8, Elixxier has also added facial expressions to the lineup. So now users have even more control to customize the models’ facial expressions to make them appear happy, sad or anything between. And you can also save custom expressions.

Overall, set.a.light 3D now provides a strong selection of models, clothing, and posing functionality. This is yet another area Elixxier has gone to great lengths to improve from V2.0, which only offered six models by contrast. While there’s always room for improvement on this front, it’s unlikely most users wouldn’t be able to use the current models and tools to get close to the desired final image.
Lighting and Light Shaping Tools
Now we’re ready to focus on lighting our subject and experimenting with a final look.
set.a.light 3D currently offers 50 different configurations of monolights, 20 speed lights, and 46 continuous lights. There’s also a healthy selection of v-flats and various size reflectors to fill in light or block light.

For the most part, each light lets you customize the white balance or color temperature and add a preset Lee filter or a custom colored filter. Some lights also have barn doors, lampshades, and external modifiers like grids or extra diffusion. And the customization on this front is pretty comprehensive.
Since V2.5.5, Elixxier has also added several widely popular Aputure continuous lights from the LS range. And they’ve been making a noticeable push to add more continuous lighting to tailor the program towards filmmakers. They also added a customizable diffuser panel or scrim, so now set.a.light 3D is also quite a powerful option for filmmakers to test various set configurations.
Overall, while set.a.light 3D likely offers more lighting options and modifiers than most creators have at their disposal, it’s incredible to have this much flexibility. It lets creators test many of their dream items and have a real understanding of whether it’s a worthy purchase. And you can do so without spending a fortune in that process.
Props
Set.a.light 3D also has quite a large selection of added props, from chairs to couches to kitchens, beds, tubs, and cabinets. The program also has a nice selection of food items, including baked goods and even platters, something they added with the V2.5.5 update.
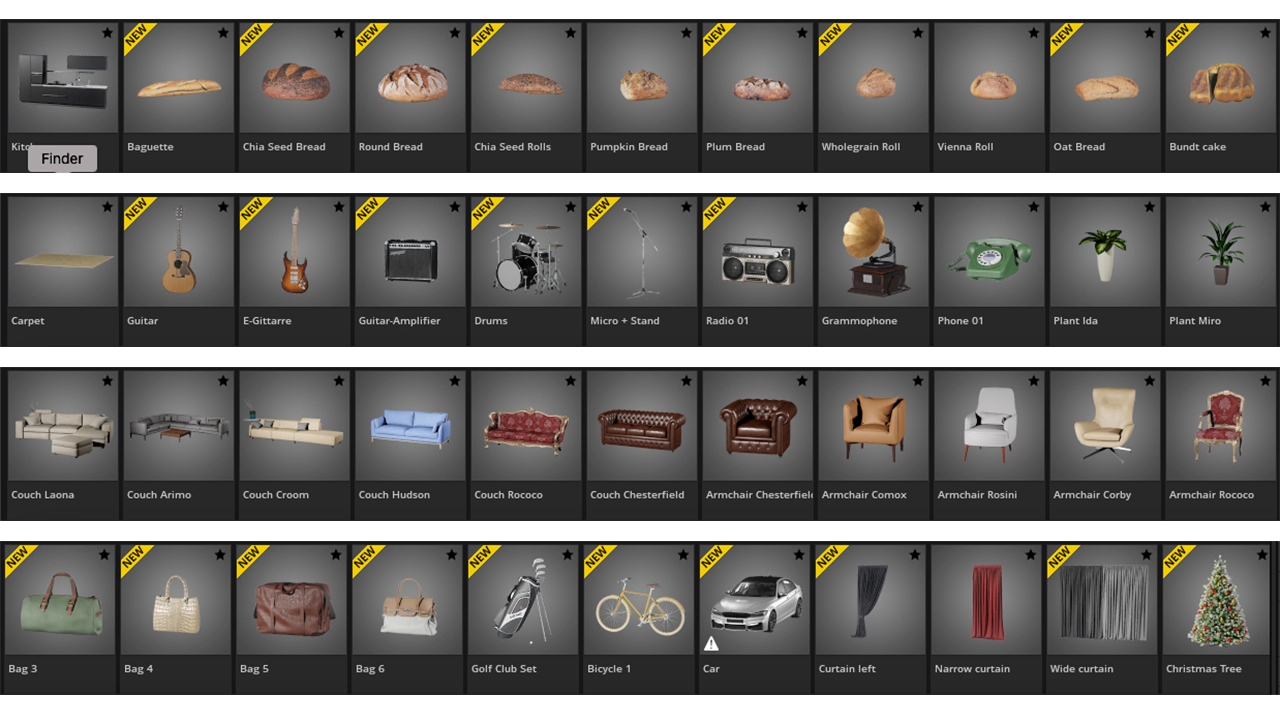
In this regard, Elixxier has made enormous leaps, as at least 40 of these props are new from V2.0. But, they’re a welcomed addition as it lets users create a virtual studio that more closely resembles their real-life space. And that added realism makes it even easier to gauge the distances of the equipment used in a certain lighting setup.
Community Tab
The Community Tab was a feature Elixxier rolled out in V2.5.1, and it’s arguably the most powerful feature the program has to offer.
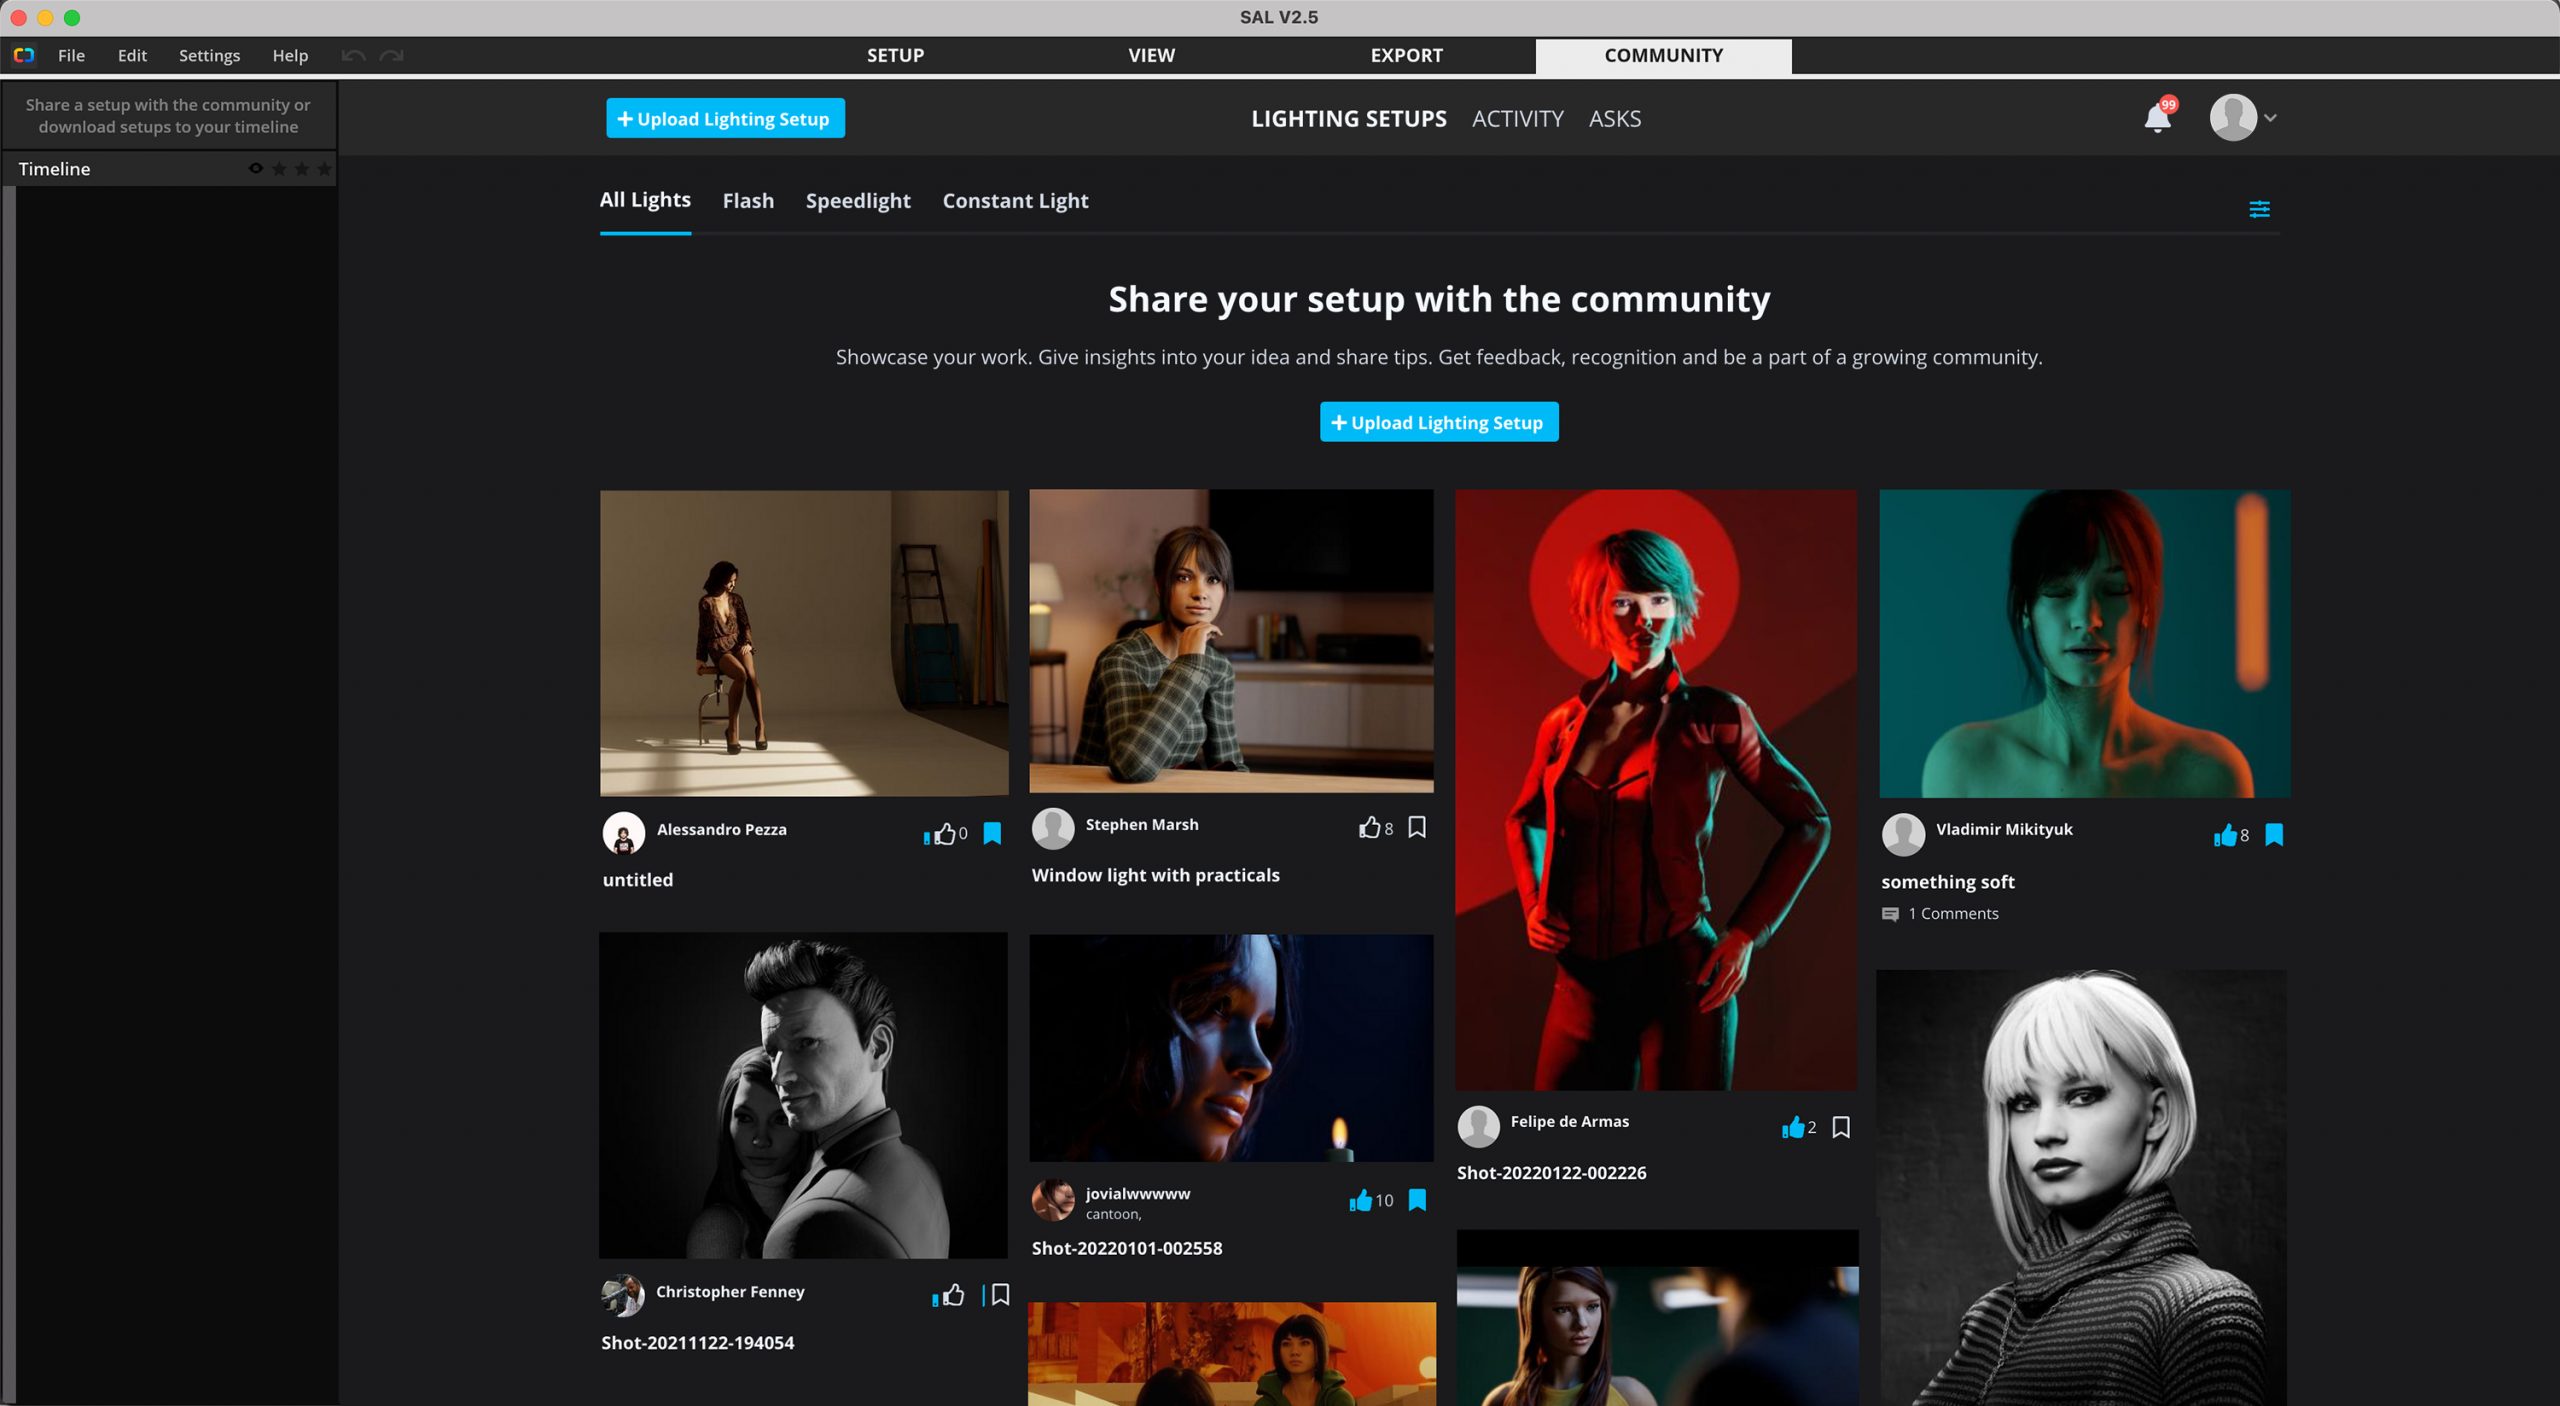
In the Community Tab, you have access to hundreds, if not, thousands of projects and sets created by other photographers and filmmakers. And you can download and review any of these saved projects to study how others make their images. Or join in the fun by uploading your own projects.
Frankly, having this feature when I first started fashion photography would have made the learning process extraordinarily easy. And in my opinion, this one feature alone is worth the price of set.a.light 3D. Some of the projects in the tab are genuinely innovative, and they’re fantastic learning lessons. And the learning potential with the Community Tab is one of the keys that separate the program from any other market.
Performance and Optimization
I tested this program using the following setup:
- Mac Mini (Late 2020)
- Apple M1 8-Core
- 16 GB DDR4 RAM
- ViewSonic VP2785-2K Monitor
Here’s my CPU load without anything running.

And here’s my CPU load opening set.a.light 3D using the project file of my apartment that I’ve been featuring throughout this review.

Lastly, here is the lad when exporting an image from that same project file.

Overall, the program is quite efficient from a CPU/GPU standpoint. The only time it bogs down is if you have a complex .set project like my apartment and use five or more lights. Otherwise, I haven’t experienced much lag, even with having 30 tabs on Safari open and Photoshop active while writing this review. However, my old Core i5 Macbook Pro (Mid 2017) did experience some lag. So I will admit the performance will depend highly on your particular computer.
Rendering
The developers behind the engine that controls the program’s illumination behavior and rendering quality have excelled. And the results are surprisingly realistic and faithful, both in light output and quality. Even the color cast of walls, ceilings, and floors, are also accurately represented in the program.
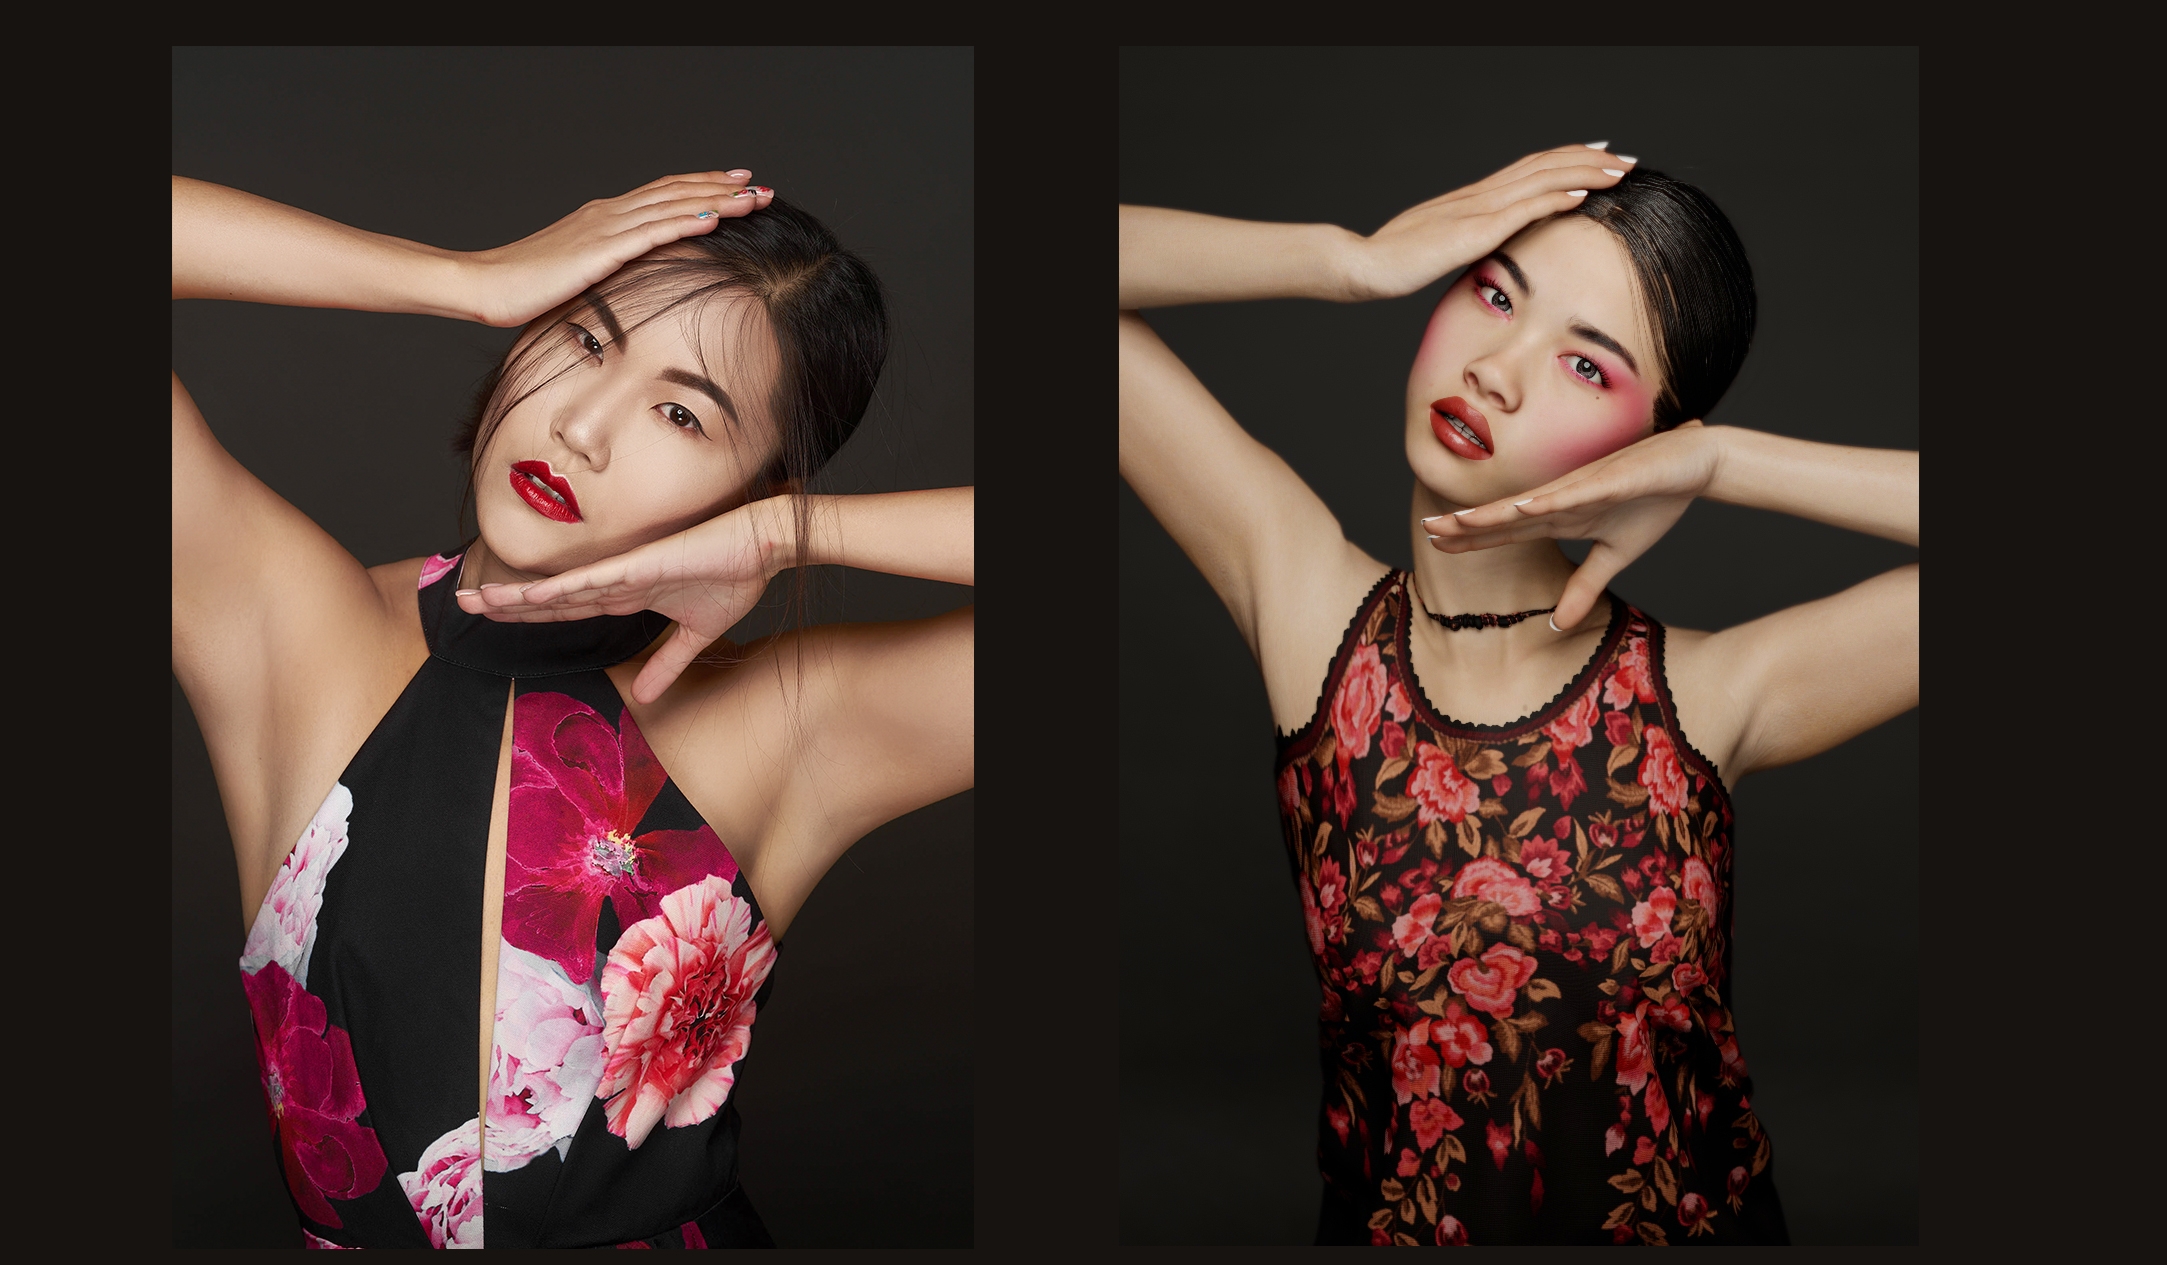
The detail and accuracy of the shadow and highlight transitions are also extremely close to real life, including how the lighting affects bone structure and figure. And the catchlights in the eyes are accurate to the lights positioning.
Considering this is a 3D modeling software designed to help photographers with lighting, it’s doubtful the rendering wouldn’t be a strength. And from my experience, the rendering accuracy is indeed an enormous strength of this program.
Limitations & Areas of Improvement
Up until now, this review’s been quite positive on set.a.light 3D. But, it’s not perfect, and there are some limitations and frustrations when using it. Thankfully, these are easy fixes and aren’t deal-breakers as far as I’m concerned.
A key limitation is you are stuck using only seamless paper. The program doesn’t currently offer: canvas, muslin, vinyl, polyester, chroma key, or collapsible backdrops. Collapsible, polyester, and muslin backdrops, in particular, are a huge hit amongst beginning photographers because of their affordability. So it’s a shame to see these options still missing.
Admittingly, you can recreate many of these backdrops using the Picture Wall. But it requires that you find a proper stock image of the backdrop, then add Curvature and experiment with the self luminosity and hardness settings. And, even while that’s helpful to gauge these backdrops somewhat, the results aren’t entirely as accurate.
That said, it would be awesome to see a few of these options added.
Another limitation and frustration comes with positioning models. Currently, there’s no quick or easy way to position models to make them look like they’re naturally sitting on a chair or leaning onto a wall. To make the model interact with a prop requires some real-time investment and some tedious maneuvering of the Advanced Posing module. We’re talking anywhere from 5 to 15 minutes here.
So for a future update, it would be helpful if there was a way to link a model to a prop so they interact with one another. It would also be helpful to see an option to prevent limbs from moving inside of the model, say you’re positioning the hands to brush the face for a beauty shot. This is another situation where you’ll have to meticulously adjust the positioning to make it look realistic. The results are worth it in both of these situations, but it’s not my favorite thing in the world.
Lastly, the umbrella and parabolic-shaped modifiers don’t have an option to move them across the umbrella rod. This is quite important to emphasize, as the distance from these modifiers to the bare flash head does indeed change the spread of light. And that, in turn, changes the quality of light. Right now, all of these modifiers are preset to a certain distance, and there’s no means to focus them to harden the light if desired.
Conclusion
In conclusion, set.a.light 3D is an incredibly useful tool in a creator’s arsenal for pre-visualizing a setup ahead of time. It’s also great for building your dream studio or experimenting with posing. But, crucially, it’s something a young photographer will find invaluable as they’re learning the more commercial mediums of photography.
So no more painfully reviewing images in post-processing and beating yourself up about angling the softbox wrong. No, thank you. And also gone are the days of playing it safe on a shoot because you’re not sure if an idea you have will work. Instead, you can pre-visualize the setup, experiment, and grow at your own pace.
Of course, there’s still no substitute for practicing with a real model and gaining practical experience. But, it’s admittingly hard to get models comfortable enough to experiment with you in person freely. It takes time and multiple shoots to build those relationships. It’s even more difficult if you’re working with a creative team with makeup and hairstylist, as now multiple people are on a time budget. So, in this regard, this program is the ideal way to experiment and test ideas with some real accuracy.
At $154 for the STUDIO version, it sounds expensive as a one-time payment. But, considering the learning opportunities available and the fact most photography software is subscription-based, it’s a worthy investment. And it’s something that can add real value to your life and development as a creator.
For us at PhotographyPX, it’s been an invaluable tool for teaching to help break down practical examples to other photographers. It’s also an excellent tool to teach lighting and plan upcoming projects. Yet, with the Community Tab, we too get better as photographers in the comfort of our homes.
About the author
“Founded in 2019, Photography PX is an upcoming resource and hub for gear reviews, tutorials, and photography resources. Our mission is to equip photographers with all of the necessary tools, techniques, and resources to help them master the craft in a fraction of the time.”